

The Ultimate Guide to Focusing with Leica M Cameras
A step-by-step process to mastering your rangefinder

Even before I picked up my first Leica rangefinder in 2020, I was scarfing down as much information I could about using this tool in the field. In the months prior, I’d been practicing with a friend’s camera in tiny bursts. But here’s the thing: nothing came close to the actual reps with my own camera. So, the idea of putting together a written guide on mastering focus with a Leica rangefinder feels a touch absurd.
But it’s exactly the type of absurdism that I look to indulge with this newsletter.
Over the last seven years, I’ve shot well over 100,000 photographs with a Leica rangefinder and, in that same time, taken every opportunity to absorb nuggets of information from seasoned masters. I’ve now reached a point where the rangefinder feels incredibly familiar to me. So much so, I’ve been able to teach students my process to drive meaningful results.
I’ve decided to put those teachings into a living guide. The goal of this piece is to share with you exactly how I would approach, improve, and refine the process of focusing with a Leica rangefinder. Look, there’s nothing that compares to in-person training and intentional practice in the field. But with this guide, my hope is to give beginners and enthusiasts actionable items to create more success in the journey. Who knows, there may even be a tip that a pro could use.
Like my other guides, I’ll look to improve this piece over time. And as always, feel free to leave your thoughts and suggestions in the comments.
Upcoming Events & Workshops
Leica Akademie: Video for Photographers - London
This June, I’m leading a two-day workshop in London for photographers who want to learn video. Whether you’re looking to create short films, branded content, or simply elevate your visual storytelling, this workshop provides a practical introduction to filmmaking. Learn more here.
Seats for my 2026 India workshop are currently sold out. If you’re still interested, you can join the waitlist here to be notified if a spot opens up or when new dates become available.
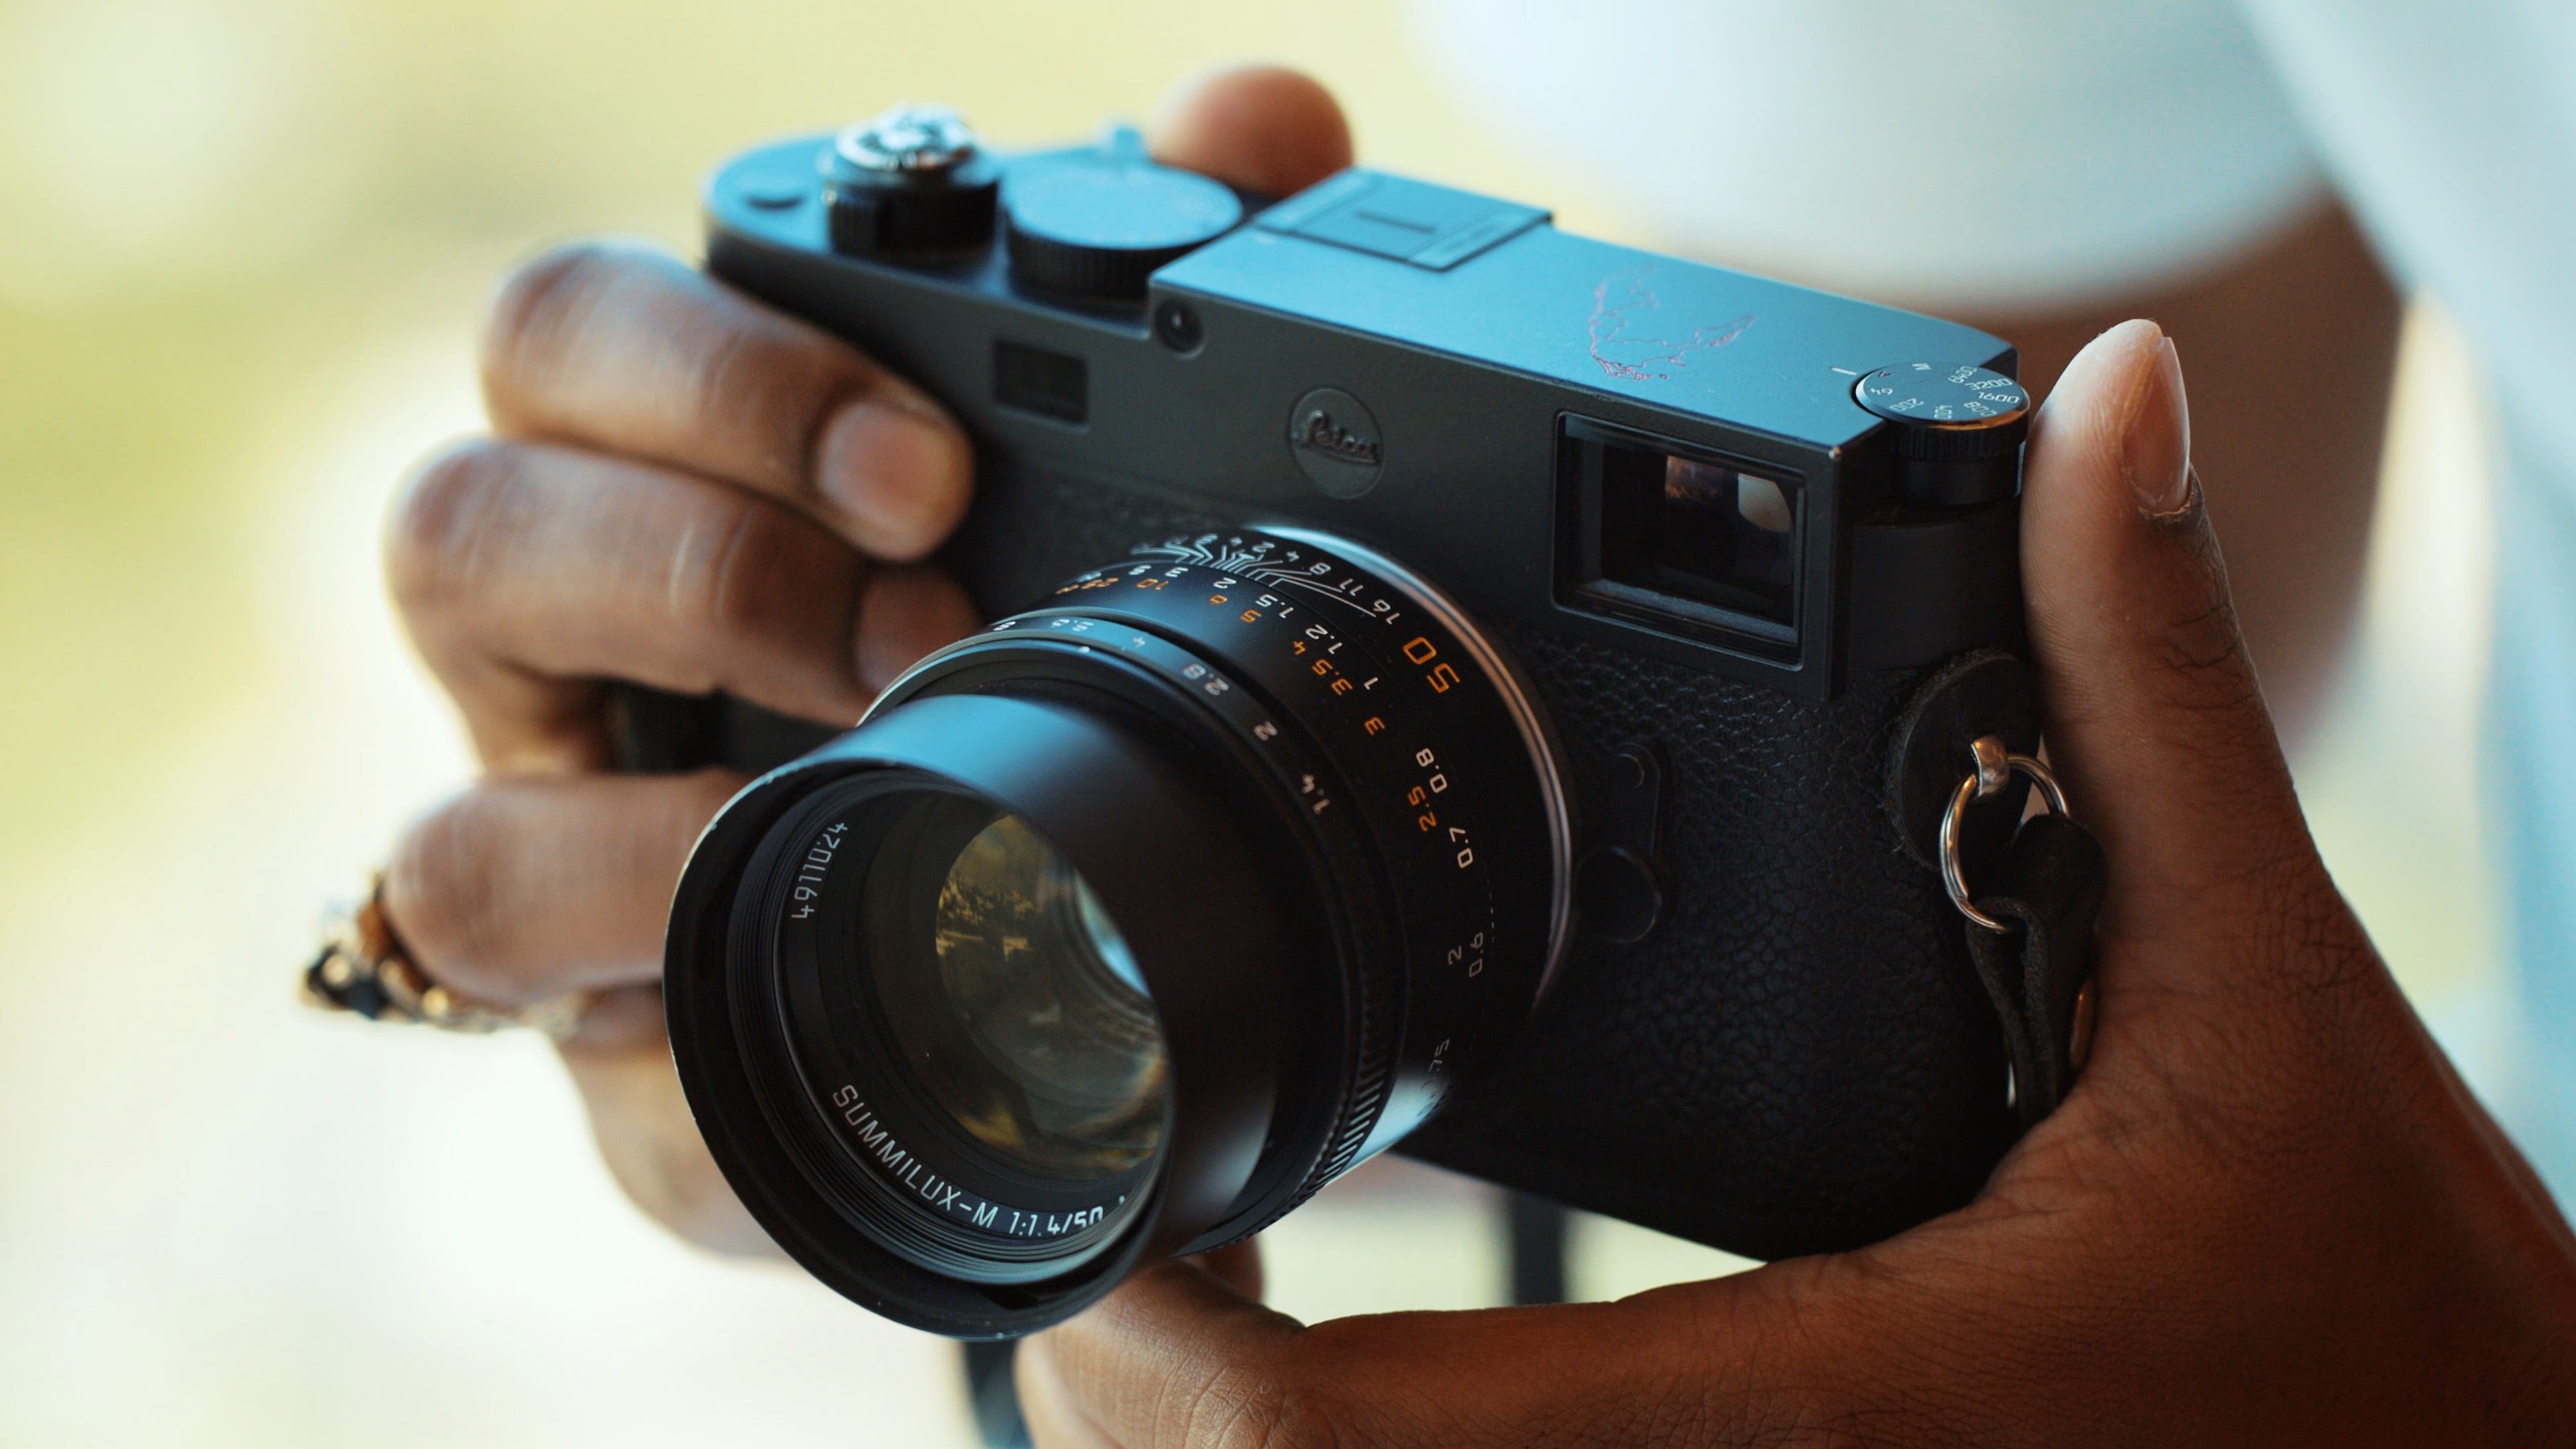
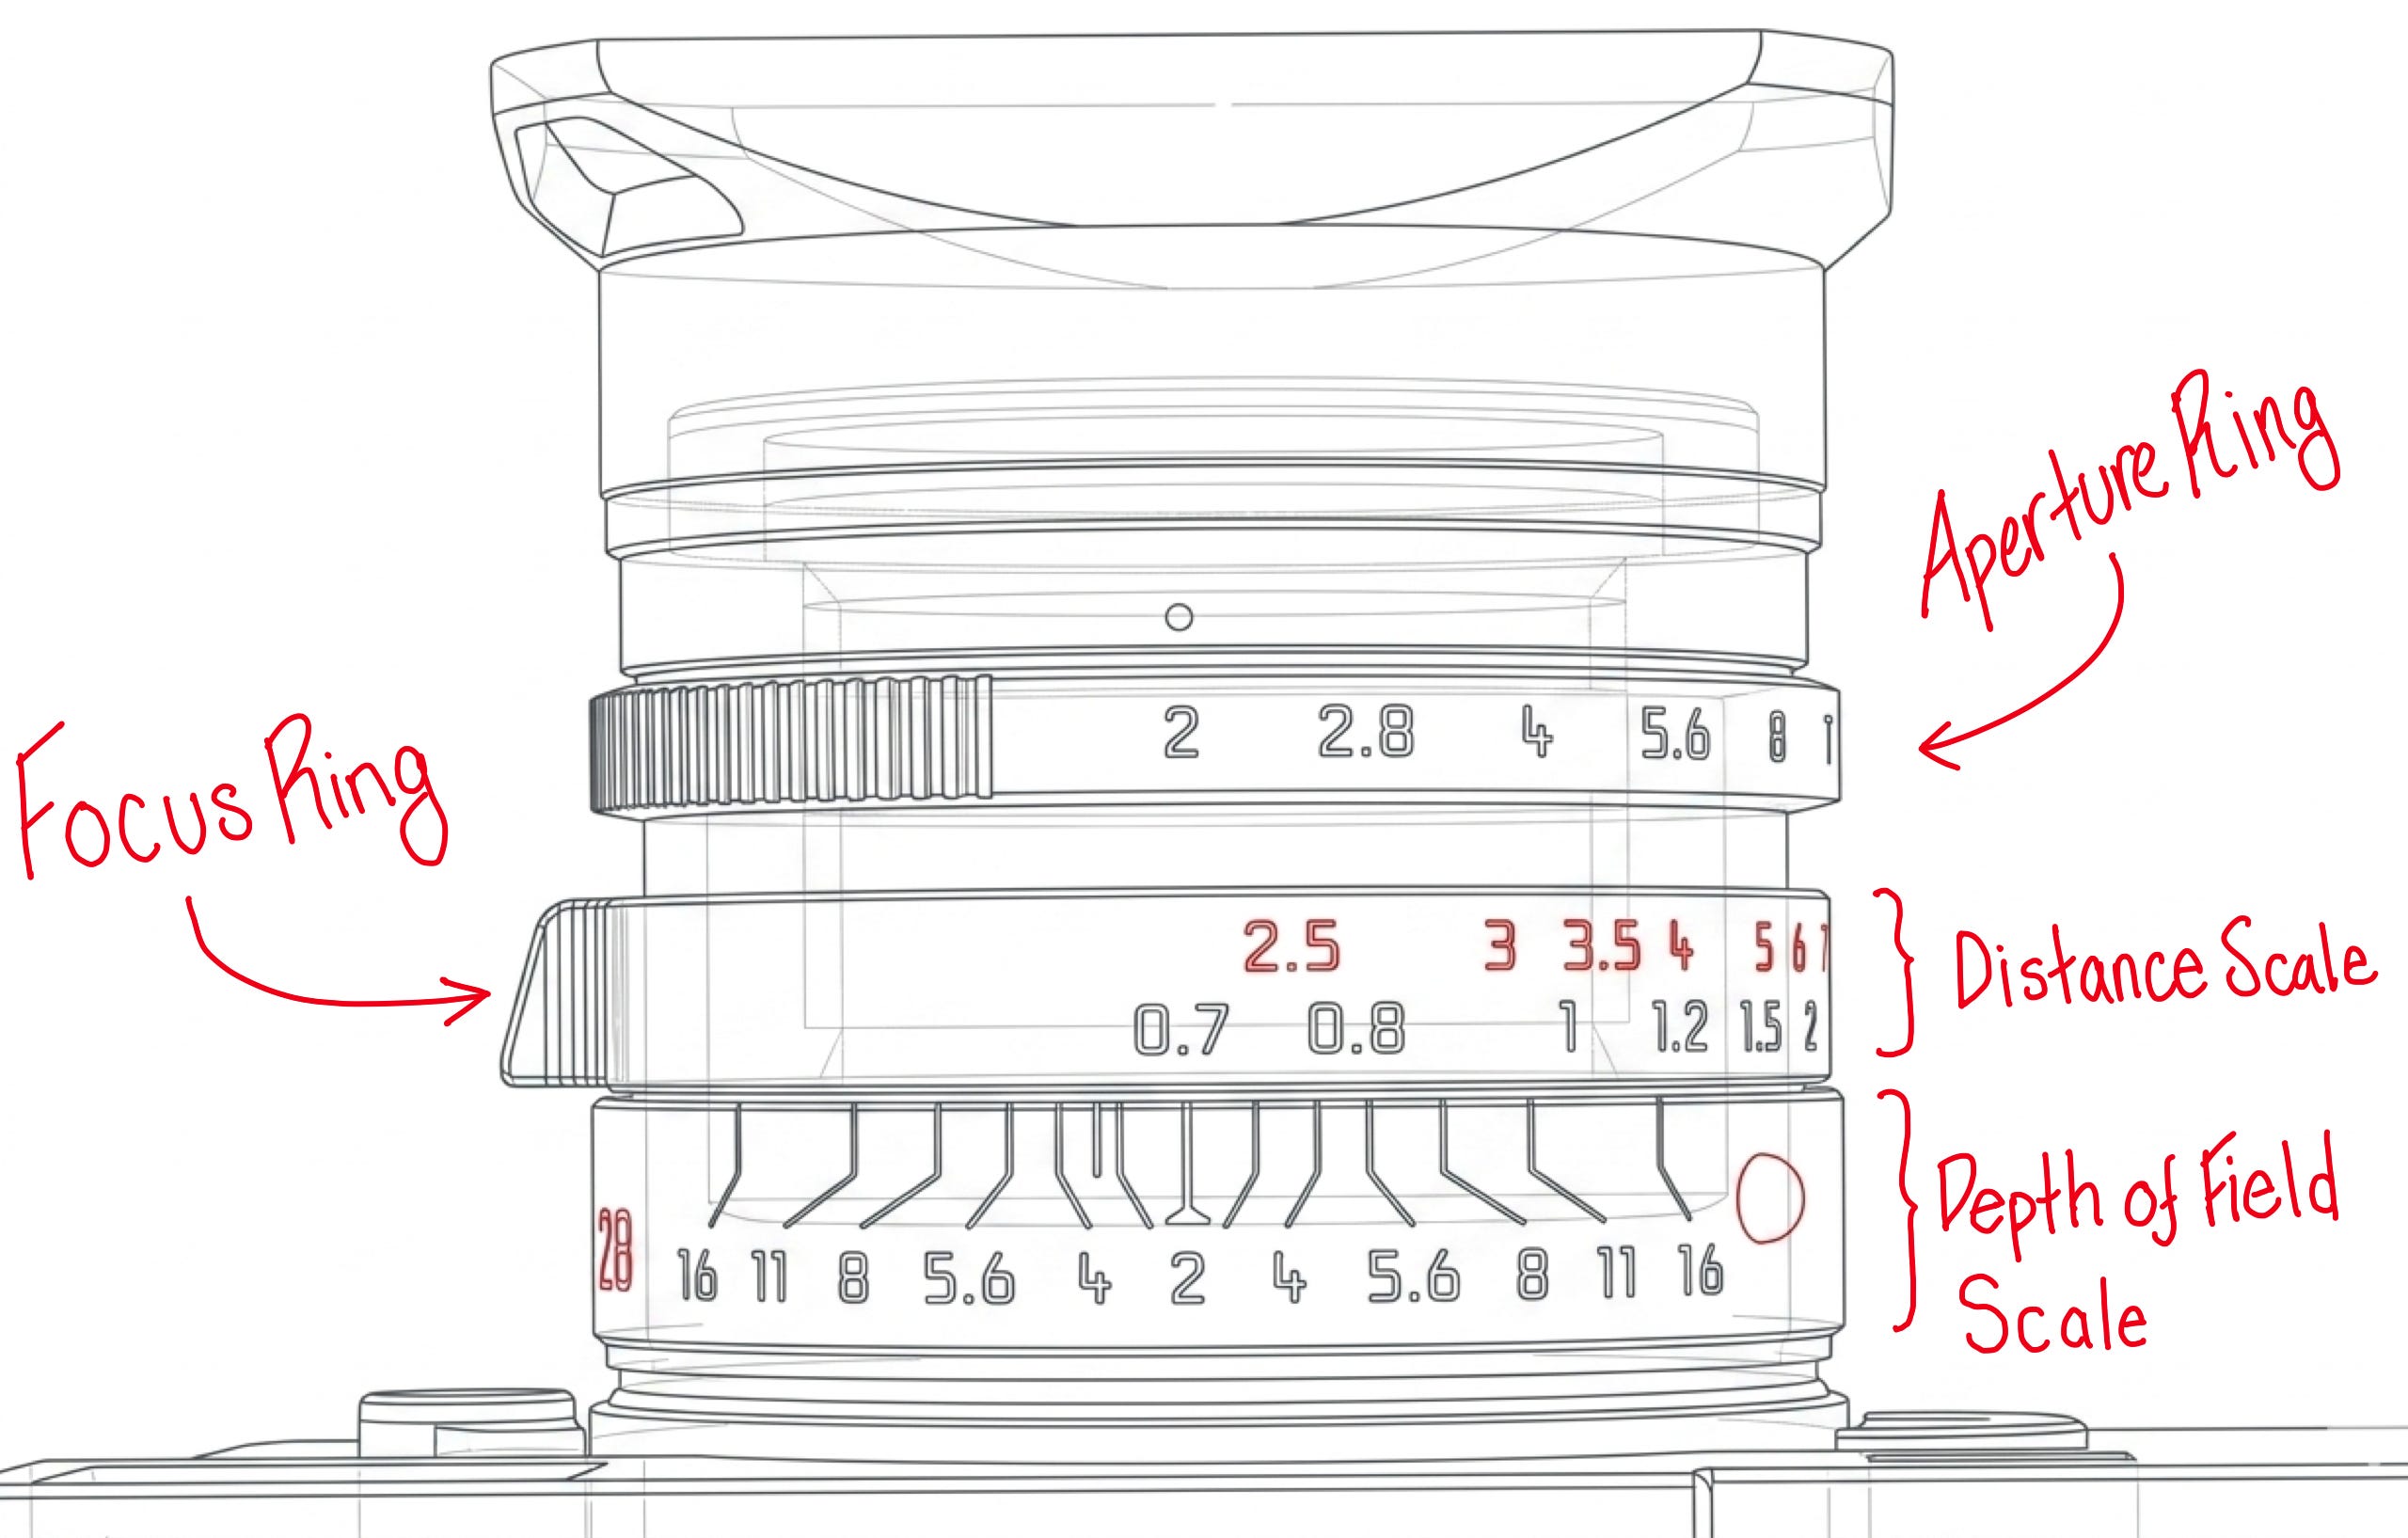
Understanding the Rangefinder
The Leica M rangefinder uses a unique mechanical system to achieve focus. While most cameras show you exactly what the lens sees, a rangefinder provides a clear, direct look at your scene through an optical viewfinder. Within that viewfinder sits a small, bright, rectangular projection known as the rangefinder patch. This projection comes from the rangefinder window located just to the right of the main viewfinder.
This is where the magic happens.
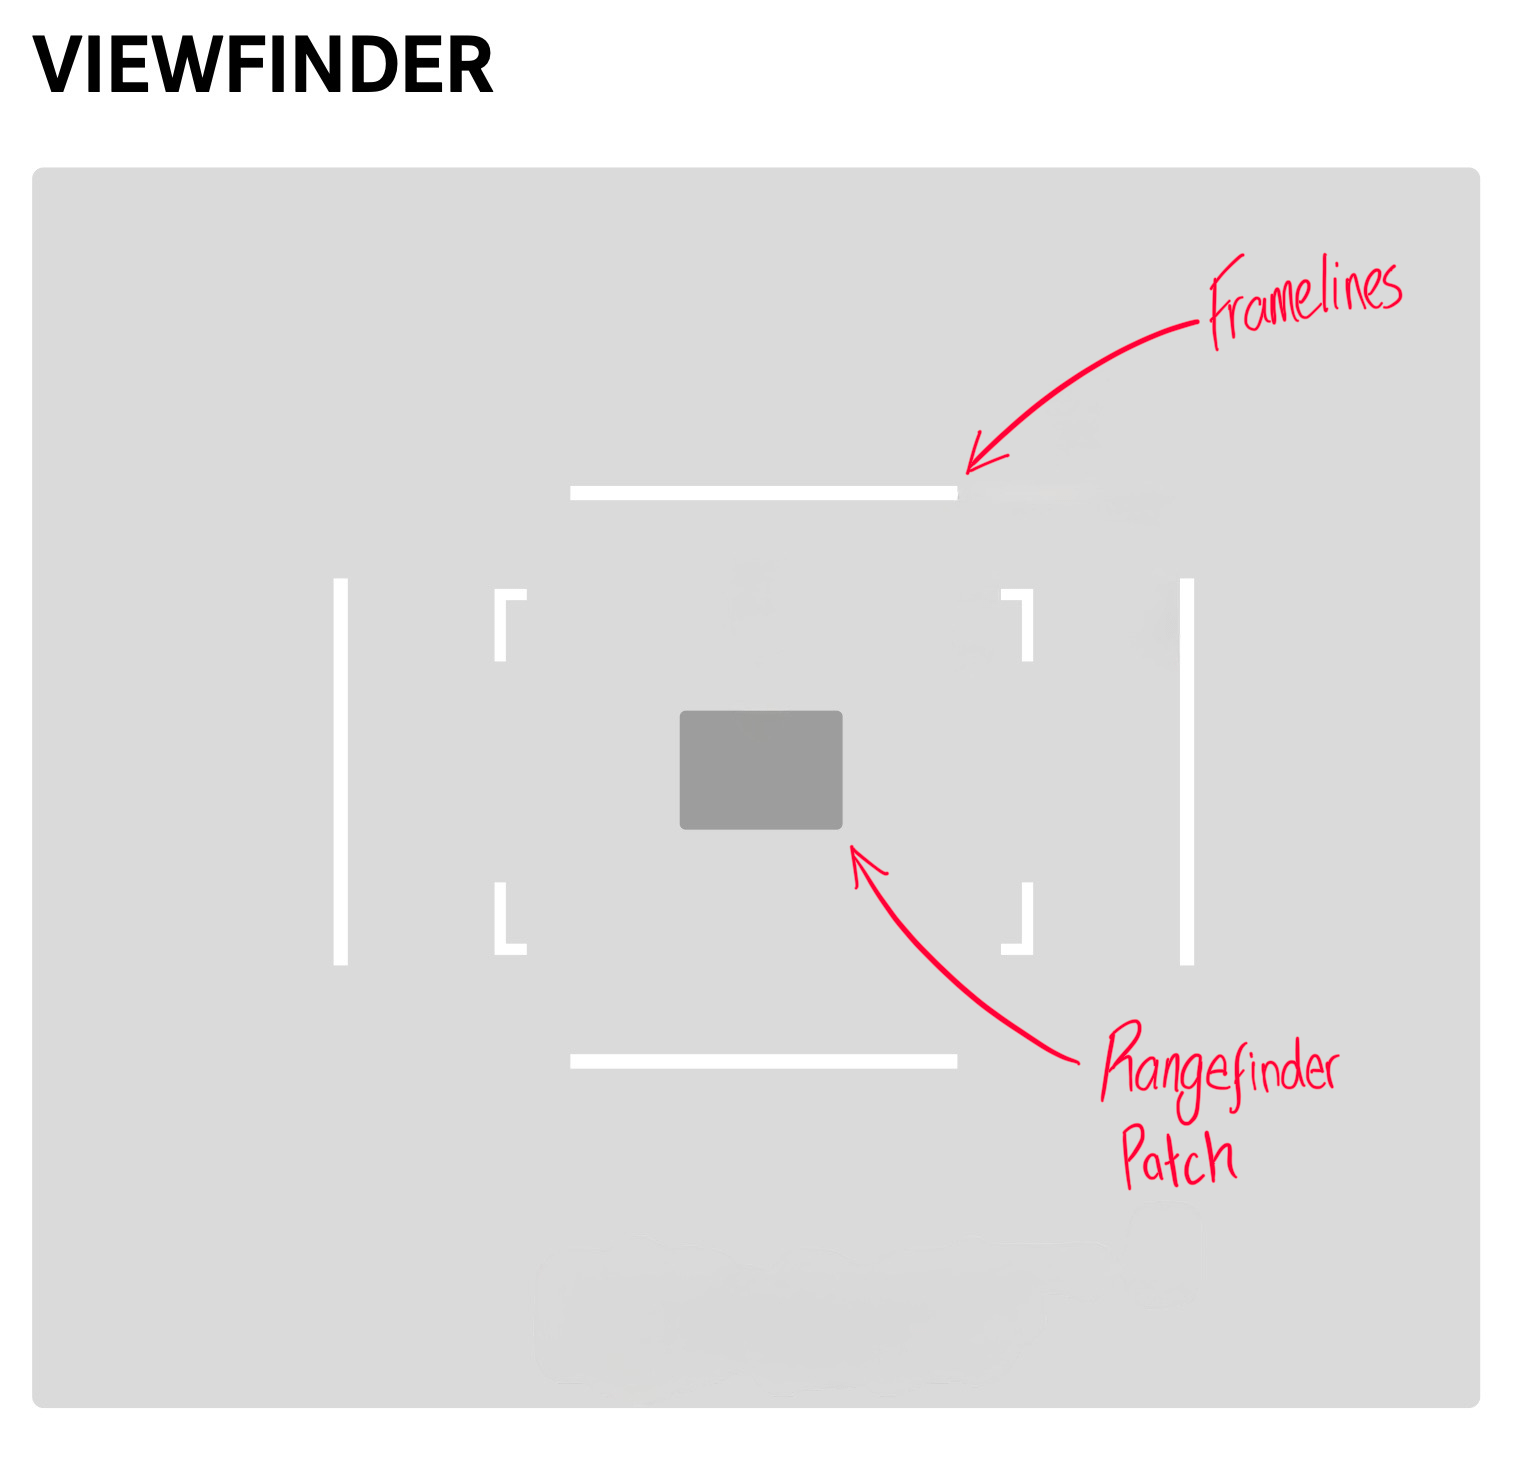
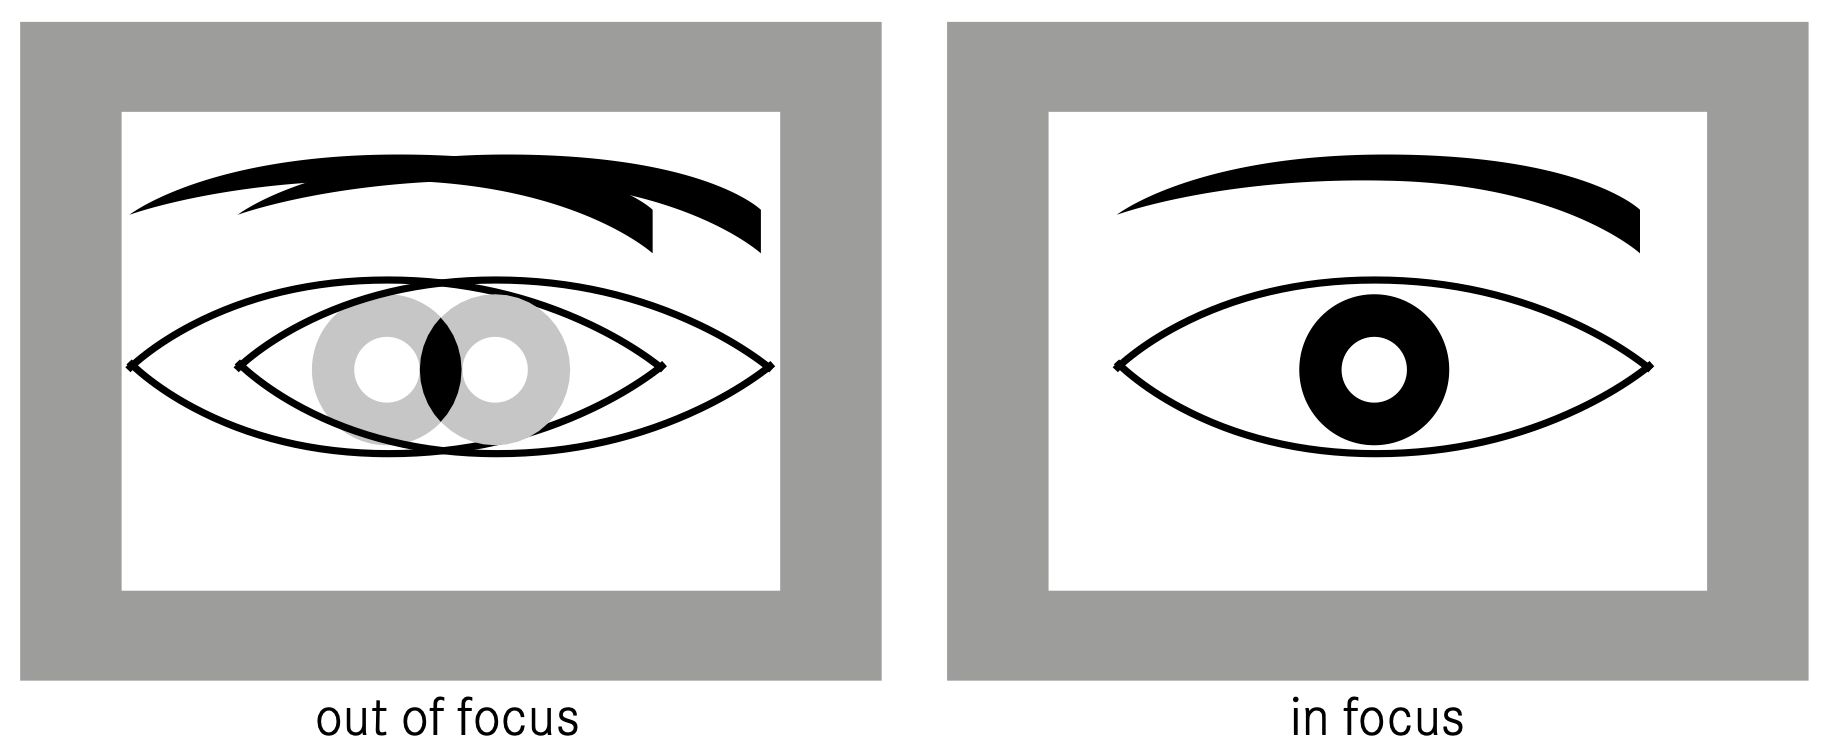
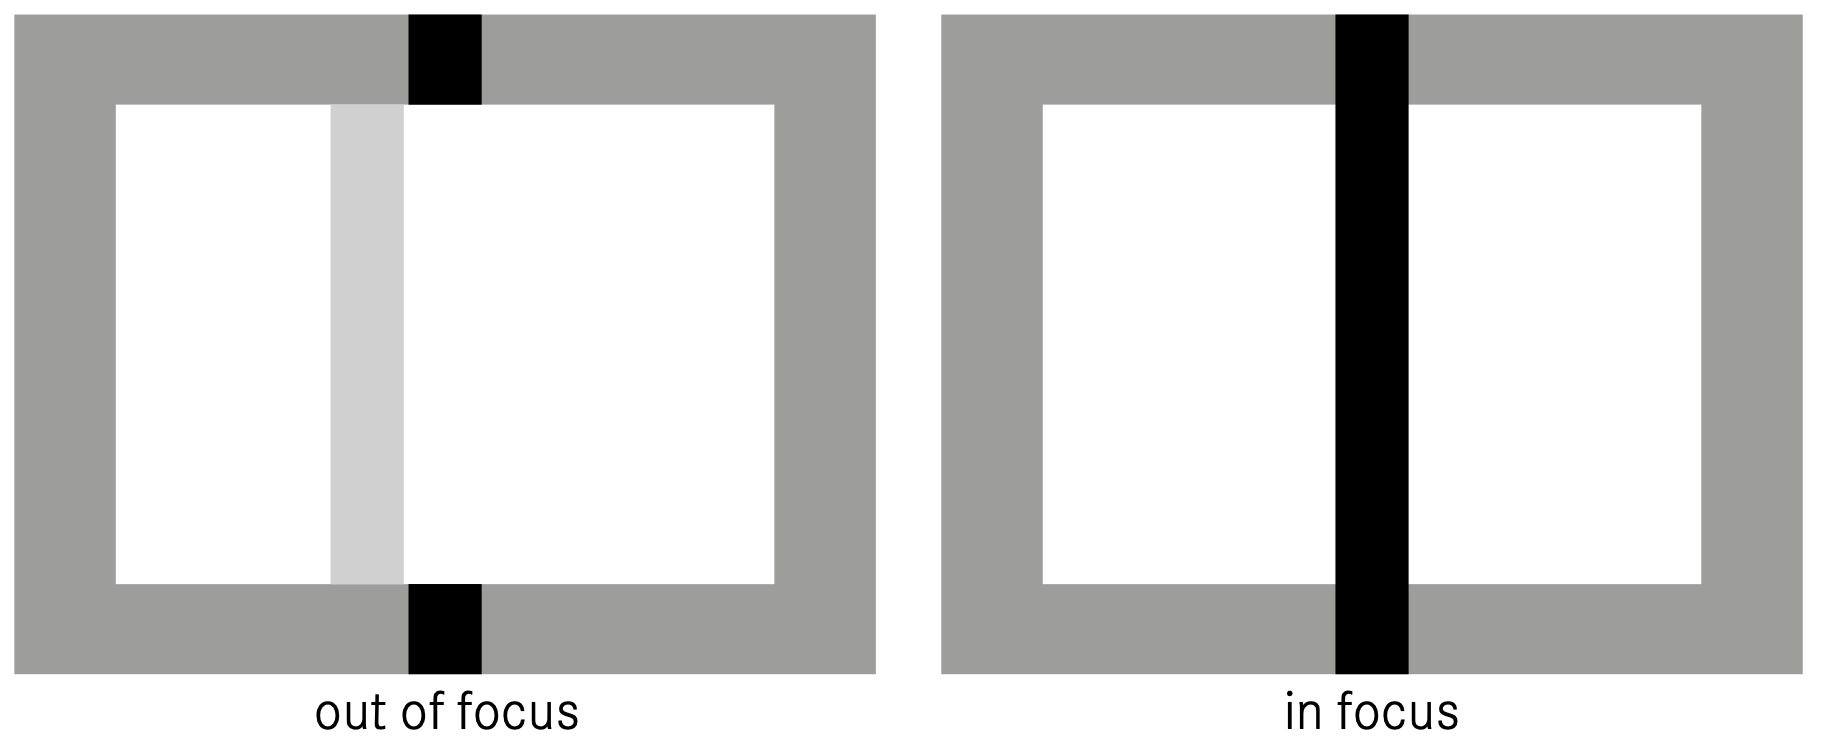
Inside the camera, a secondary window gathers light and reflects a second version of your subject into that rangefinder patch. When your subject is out of focus, you’ll see a ghosted, double image. By turning the focus ring on your lens, you physically adjust the internal alignment and the position of this ghosted image.
When the two images align perfectly to become one, your subject is in focus.
Lenses from 28mm through 135mm will trigger frame lines in the viewfinder to indicate the edges of your final image. This viewfinder also allows you to see outside the frame lines and anticipate the moment.
The Leica rangefinder is an analogue, tactile experience that, with practice, can land in-focus shots faster than modern autofocus cameras.
Now that you understand how a rangefinder works, let’s jump into mastering it for your environment.
Get An Eye Exam
Look, you can’t focus on what you can’t see. It sounds obvious, but many people blame their Leica’s calibration when their own optics are the problem. If you find yourself squinting really hard through the viewfinder or it never quite looks sharp, I’d say it’s time for a checkup.
Leica also offers diopters for a reason. If you wear glasses, find the one that makes that patch snap into clarity. A rangefinder is a precision instrument, but it also relies on the precision of your own vision.
Keep Your Camera Clean
Allow me to indulge an old-man-yells-at-sky moment and say: keep your cameras clean. Every chance you get! A smudge on the viewfinder or the rangefinder window is the quickest way to ruin your Leica experience.
The rangefinder system relies on overlaying two clear images, so even a small fingerprint can dull the contrast of the central patch, making it feel like you’re focusing through a fog. Keep a microfibre cloth in your pocket. Clean the front windows and the eyepiece regularly. A clean rangefinder makes for easier shooting.
Pick One Lens to Master First
Mastering focus with the rangefinder is tough. Doing it while you cycle through a multitude of lenses is like switching between a driver, pitching wedge, and iron when you’re just starting to golf. Things feel harder than they need to be.
Pick one lens to start. Look to build your foundation with that lens. Then graduate to additional perspectives when you feel confident in your process.
Know Where To Look
When you look through your viewfinder, don’t just stare aimlessly into the centre of the frame. Have a reference point, then orient the rangefinder patch to a point of contrast. What does this mean?
Like I mentioned earlier, the rangefinder patch is a rectangle that appears in the middle of your viewfinder. Knowing this, I’ll look for the left edge of the rangefinder patch. Instead of my pupil darting around the middle to locate the patch, I’ve trained my eye to look for the left edge specifically.
You need to know exactly where that rectangular patch lives. This is a fractional but intentional practice that strengthens your focusing ability over time. If you can locate the patch quickly and accurately, you can focus that much faster in the field.
I hone in on that left edge, then follow that as a I move my camera to find a point to acquire focus on. Once I’ve found that point, my sight drifts to the centre of the rangefinder patch to start focusing.
Aim For Contrast
So you know how to locate the rangefinder patch, where do you aim it? For many, it’s almost always looking for a clear point of contrast to pull focus and then recomposing for my shot.
Once I’ve established my distance from my subject, let’s say for a medium length portrait, I’ll look at where their iris meets the sclera of their eye, or their clothing meeting their neckline, or if I have more depth of field, where their hair ends and the sky behind them begins.
I’m aiming my central patch for where there is clear contrast between two areas. I’m only tilting or panning my camera (so that I’m not changing the distance of my camera from my subject), looking for this point of contrast, then pulling focus with my lens so that the overlaying images appear more clearly when they line up. Once they feel lined up, I recompose my shot (again, tilt or pan) and take the picture.
The rangefinder patch thrives on contrast. If you’re trying to focus on a flat, featureless wall, you’ll be there all day. Again, look for an eyelash, the edge of a collar, or a high-contrast transition. Aim your patch at that point, pull focus on your lens, and then recompose your shot. Be wary of backlit situations or low-light scenes where contrast begins to fade away. In these moments, you’ll really have to hunt for any hard edge you can find. Or, lean on the techniques I’ll discuss later in this guide.
Start With Fast Shutters
Focusing is hard enough. Don’t add camera shake to the mix while you’re learning. Start by shooting with fast shutter speeds—at least 1/250 if not higher—to ensure that any blur you see is a result of focus, not movement.
Perhaps it goes without saying but I’ll mention it here anyway: shoot with good posture as well. Keep your elbows in, bend with the knees, avoid leaning, and snap the photo just after you exhale but before you inhale. Nailing a great shot is about clean, repeatable mechanics.
Be intentional with your shooting mechanics and you’ll be shooting below 1/30 soon.
Practice With Minimum Focus
Leica rangefinders support a minimum focus down to 0.7m or just under 2.5 feet. Make this is your starting point for training. Set your lens to this distance and leave it there for some early reps.
Walk around your house, studio, or streets, scan for a subject, position yourself so that at 0.7m, whatever it may be, is in focus and shoot.
Repeat.
Integrate this practice into your overall routine. Do it so often that you start calibrating your physical body into understanding where 0.7m is. For adults, it may land just around where your fingers would be if you stretched your arm in front of you.
By doing this often, you’ll start to identify where the rangefinder danger zone exists: the area where it’s too close to focus on a subject through the viewfinder.
Lenses that support focusing closer than 0.7m will rely on Live View on the LCD or an EVF accessory to confirm focus.
Push From Near Focus
This is something I picked up many years ago from my friend Jason Roman. When you’re starting out, keep your lens at the minimum focus distance. When you bring the camera to your eye, now you only move the focus tab in one direction—toward infinity. It simplifies the mechanical process and stops you from dancing with the focus tab back and forth. It’s a deliberate, one-way street to sharpness that saves precious split seconds.
Rock Your Body
Precision focusing at wide apertures can be a game of millimetres. Instead of frantically twisting the focus ring back and forth, try rocking your body slightly toward or away from your subject.
Have your lens set to a distance that’ll suit the image you’re looking for, close the gap to the subject, and instead of pulling your focus tab back and forth, just rock your body toward or away from the subject.
Again, you’re employing the same techniques of locating the central patch, looking for a point of contrast, and recomposing. All you’re adding now is a slight movement of the body forward or backward.
When it feels right, take that first shot, then push in ever so slightly for another shot, then ever so slightly back behind your initial point for another shot. Three shots in one rocking motion.
This low-burst manual approach acts like physical bracketing, ensuring at least one frame hits the mark perfectly.
Learn Where One Metre Lives
As you progress in your rangefinder journey, I’d encourage you to learn to gauge where the one-metre mark (roughly 3 feet) is from your body. If you’re asking me, the one-metre mark is the most important distance in street photography. To master it, take a tape measure and find exactly where one metre sits from your eye. Use your arm as a reference—most likely it’s just beyond your fingertips.
Memorize that physical gap. Practice guessing the distance to objects, then checking your lens to see how close you were. If you know where a metre is, you know when something is closer or further from that point. With that in mind, you can prep your lens before you approach your subject so you’re not dancing with your focus tab in the moment. Instead, you’re approaching with your focus tab in a close approximation, composing, and adjusting mostly with your body for the desired frame.
Look to learn where one metre is relative to your body and leverage that distance when you’re capturing in the field.
Learn The Clock on Your Lens
For those of you fortunate enough to have a lens with a focus tab on it, you have a great learning opportunity in front of you.
Take your lens and move the focus tab so that on the distance scale you see the one-metre mark is lined up. Then turn your camera around so you’re looking at the front and, as if the focus tab were the hour hand on a clock, look at what position it’s in. For my specific Summicron 28mm, one-metre lands at roughly 5 o’clock.
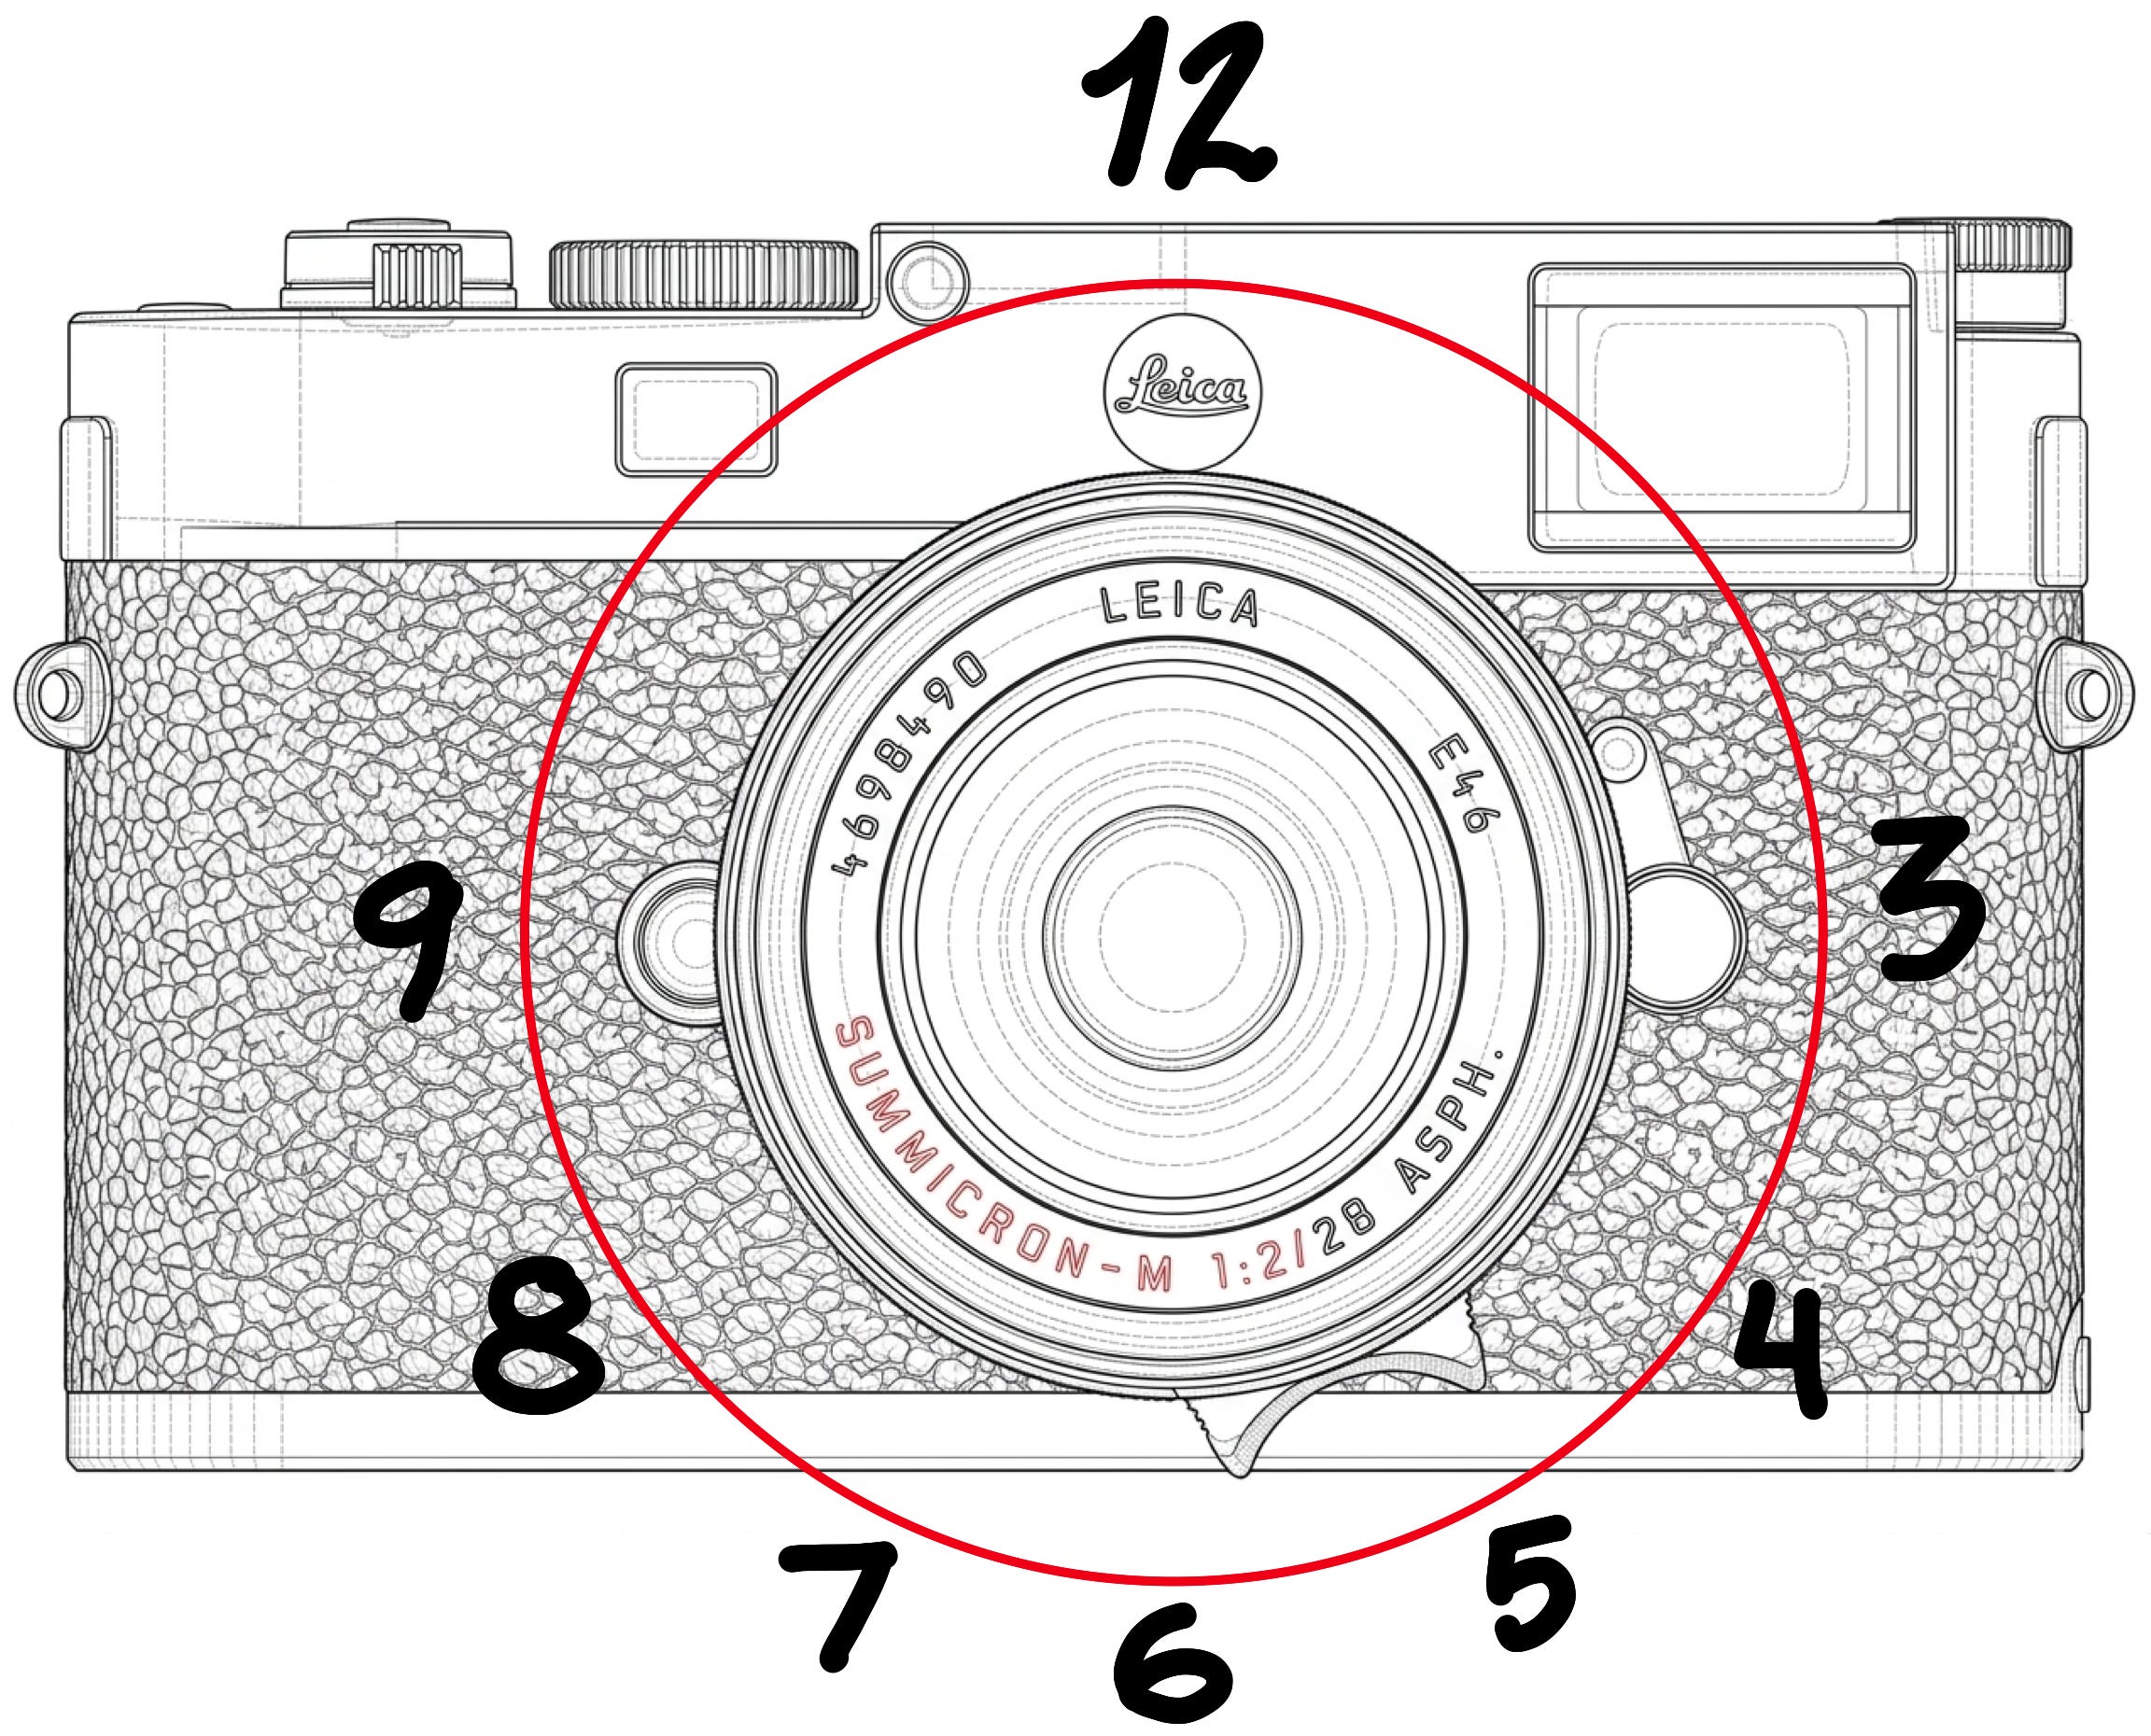
Now move the focus tab to exactly 6 o’clock and see where it lands. For this same lens, it lands a touch below 1.5m.
At 7 o’clock, this lens is at the 3-metre mark.
Why is this valuable? When you deeply understand how the position of your focus tab translates to the focus of your image, you can anticipate your shots much better, prepare faster, and even outperform an autofocus camera.
Let’s say I’m at an event with my 28mm lens. I know that at a 1-metre distance I can capture a portrait that has the head to belly of a person in frame. At 1.5m I get to just above their knees in the frame. At a 3m distance, I’m getting their entire body.
With this information, I can pre-visualize a shot. I’ll look to anticipate the moment, move the focus tab to the rough clock position before I even lift my camera, close the gap, and then refine the focus as needed.
And there’s something that makes this even easier…
Range/Zone Focus
Your Leica lenses have a depth-of-field scale for a reason. Learn to read those markings. As you stop down your aperture, you’ll have more of a range that’ll be in focus at any given marker position. Higher aperture number, more depth of field.
In the example below, you see that I’ve my focus tab is moved to align 1.2m at the mid point. With an aperture of F5.6, I use the respective marker on the depth of field scale to understand I have a range of just under 1m to a touch over 1.5m. This means that anything in that range of my camera sensor will be in focus.
With this, I just have to get the person one metre or so in front of me and take the picture. No additional adjustments required.
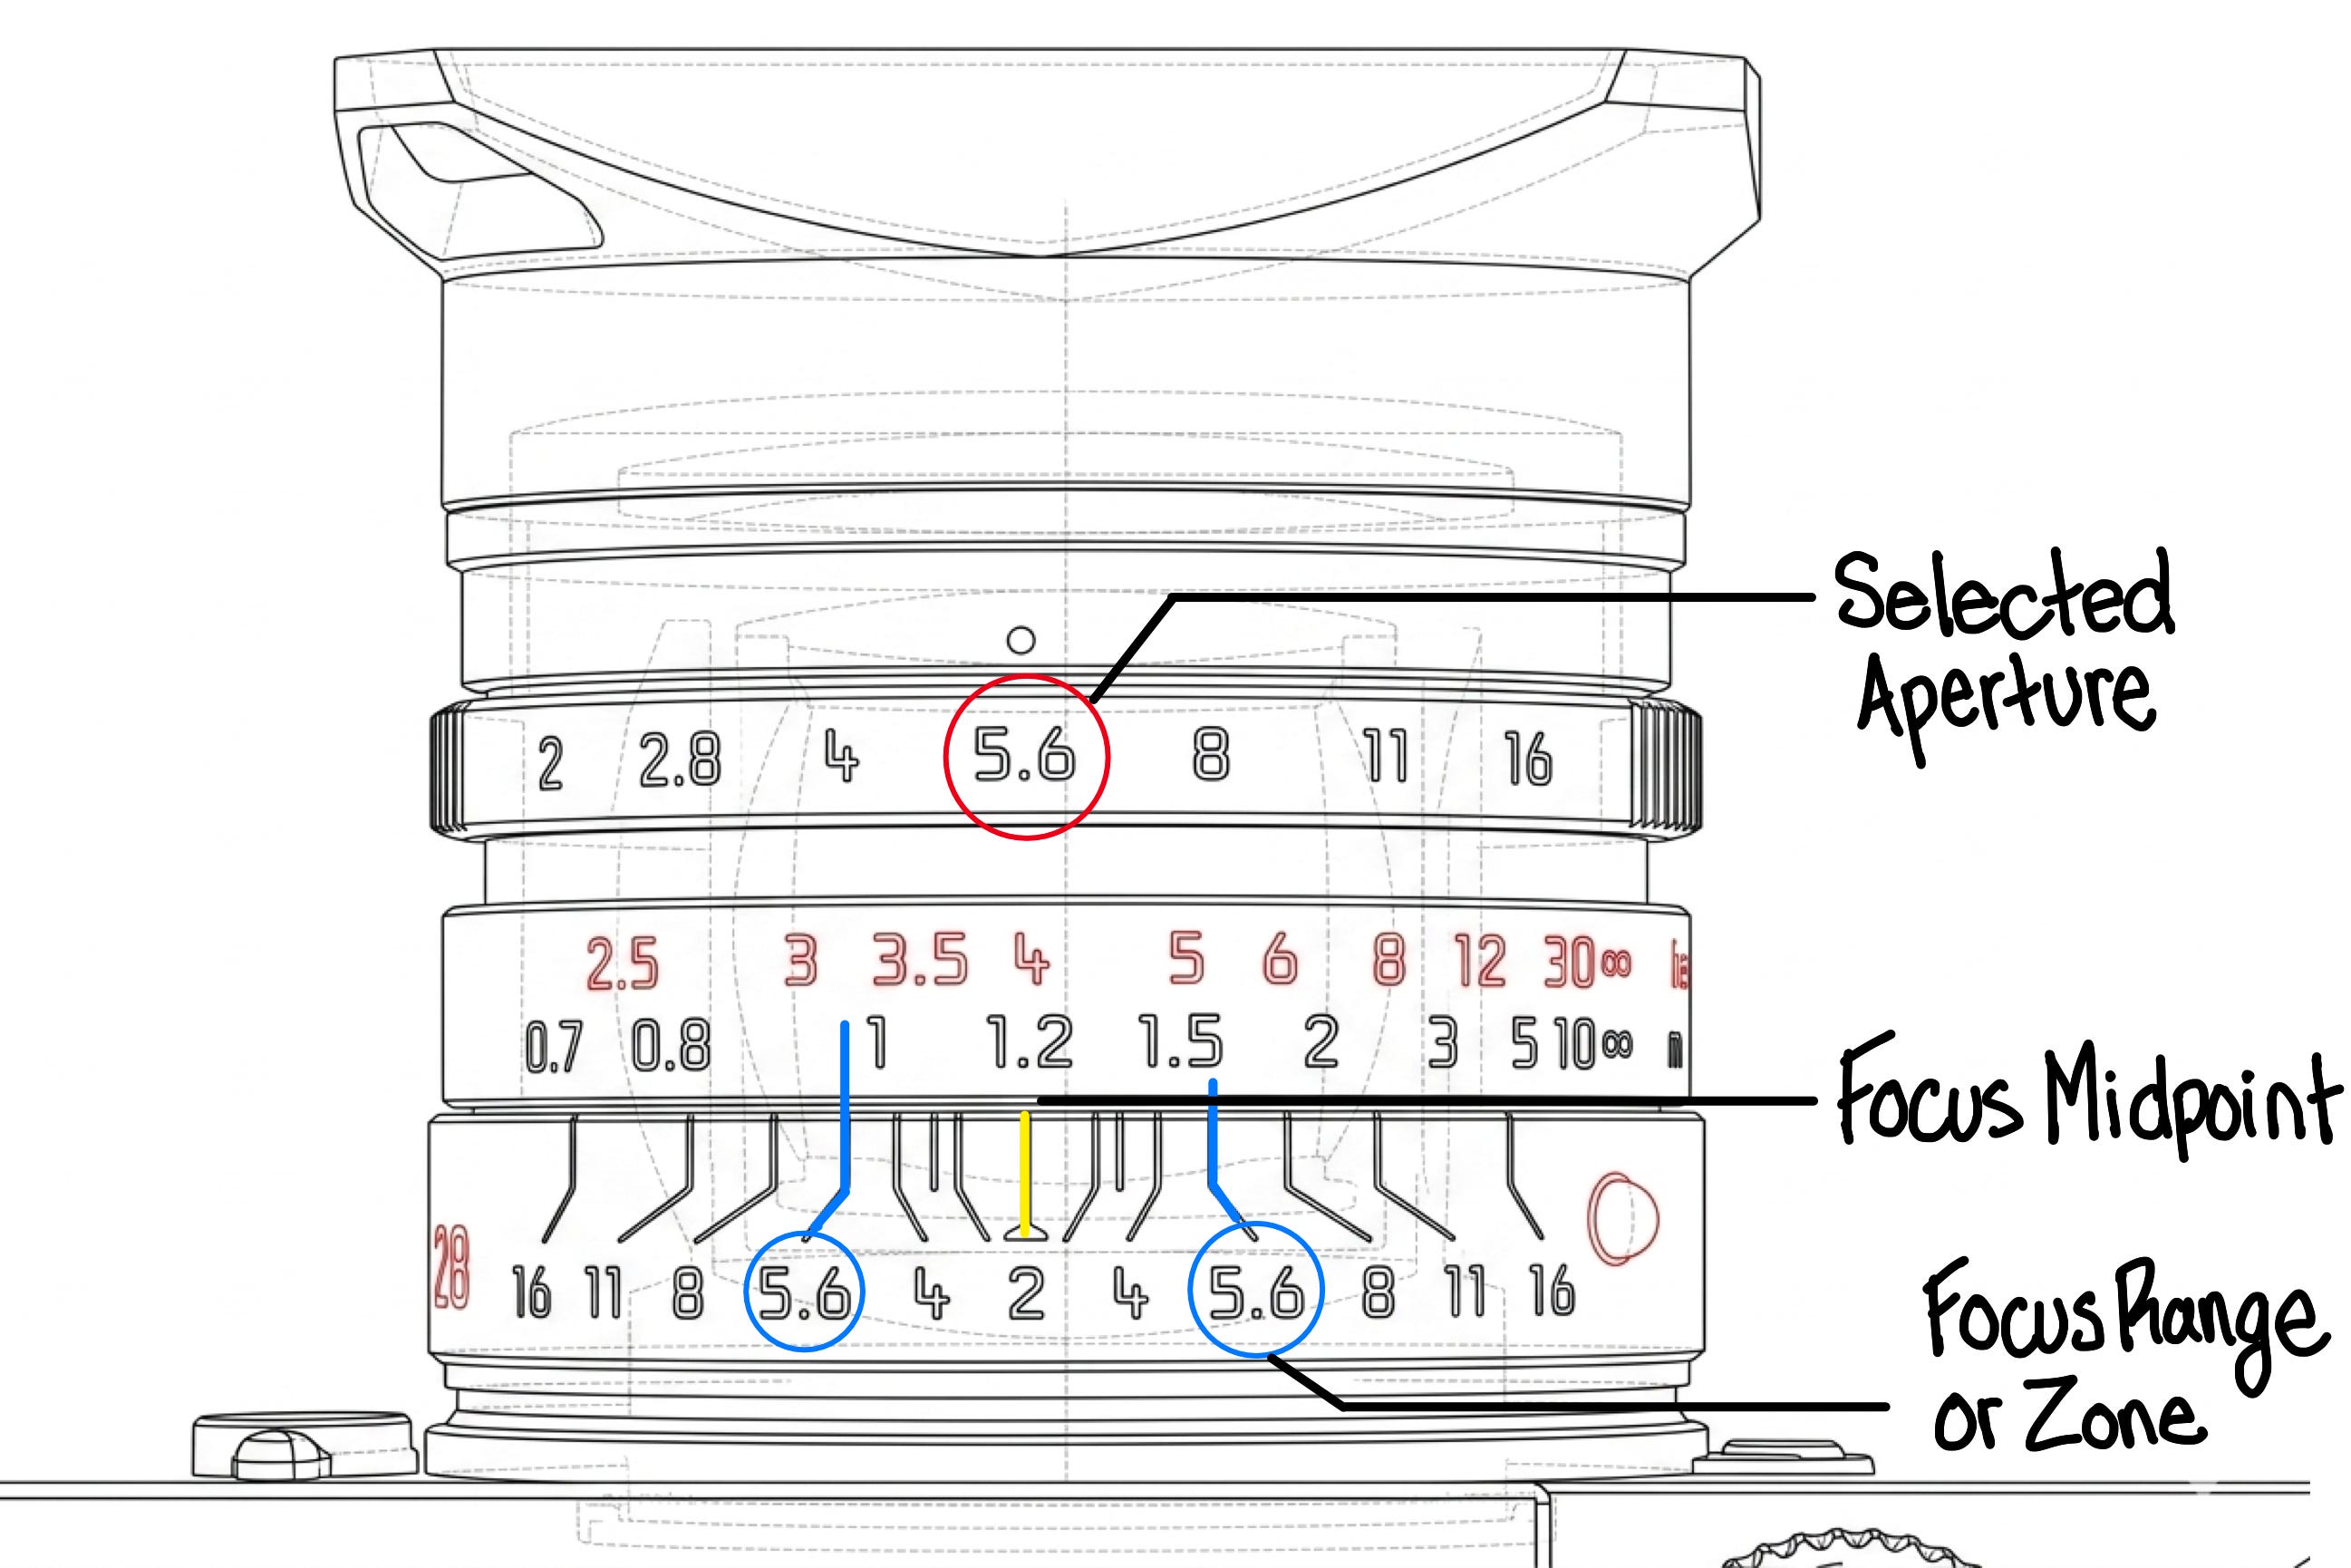
This is range focusing or zone focusing. By stopping your lens down to a narrow aperture and a specific zone—say, F5.6 and a range of 2m to 10m on this same lens—you don’t even need to use the central patch, or the viewfinder for that matter. You just wait for the action to get within that range and fire.
Hyperfocusing
The hyperfocal distance is sort of a cheat code in the rangefinder world. It’s the point where everything from a certain distance all the way to infinity is in focus. For many wide lenses, this could be everything from 2m to forever.
All you’re doing is using a comfortably narrow aperture like F8.0 and moving your focus so the infinity marker on your lens distance scale aligns with the respective aperture marker on the right side of the scale. Look at the distance marker on the left side of the scale and that’s your range.
If you’re shooting landscapes or fast-moving street scenes in bright light, you can set your lens to the hyperfocal mark and stop worrying about the patch entirely.
Master Two Times
For some lenses, I’ll look to master two clock positions to move between in bright environments. Using my Summicron as an example again, I shift between 5 and 7 o’clock. If something is more than 1.5m away, I put my focus tab at 7 o’clock. If I’m in the thick of it and my subject is going to be closer, I move the tab to 5 o’clock.
That’s it.
My brain then just locks into my environment and I’m just scanning for the story. When I know what I want, I orient myself to the subject, move the focus tab to one of two positions, and just start firing. This, practiced over time, becomes a superpower in street photography and allows you to be more present in the moment.
Calibrate Your Camera If Needed
Sometimes, it’s not you—it’s the gear. If you find that you’re consistently front-focusing or back-focusing despite your best efforts, your rangefinder might be out of alignment. You can test this at home by shooting a ruler at a 45-degree angle at minimum focus. Position it a measured distance from your camera and test to see if the distance scale on your camera is lining up with the actual distance to the point on the ruler you’re focusing on.
Perfect Practice Makes Perfect
Don’t fall into the trap of lazy practice where you just fire off shots and hope for the best. Be intentional. Spend a day only using the focus tab clock method. Spend another day only using the rocking method. Like any craft, you have to break it down into components before you can put it all together. The goal is to make the camera an extension of your hand, not a puzzle you’re trying to solve.
Cheat
The idea of being a purist is attractive, but not at the expense of missing too many moments. If the lighting is abysmal or you’re shooting a wide-open Noctilux often, use the other tools that are available.
Switch to Live View on the rear screen or slide on a Visoflex EVF to see a clearer view. Focus peaking and a magnified view are great in-camera tools that the optical rangefinder simply can’t match in extreme situations.
There’s also the Leica M EV1 which integrates an EVF instead of an optical viewfinder. Some may think this is blasphemy, but for those with fading vision, thick glasses, or vintage lenses, these tools breathe new life into the creative journey.
Do not let your pride get in the way of great stories.
Recap
When I started brainstorming this guide, there were only a few tips I had in mind. But as I peeled back all my teachings over the years, I realized there’s so much more to consider. While some of it may feel obvious, I feel that each point earns its spot:
Get your eyes checked and use a diopter if needed
Keep your viewfinder and rangefinder windows clean
Use an edge of the rangefinder patch for as a reference point
Pick one lens to master at first
Look for a point of contrast to focus on
Practice shooting at 0.7m
Always pull focus from near to infinity
Lean on fast shutter speeds while learning
Rock your body for micro-adjustments
Physically memorize the one-metre distance
Use the focus tab as a tactile clock to mark distances
Use the depth of field scale for zone focusing
Use hyperfocal distances for easier shooting
Master two primary tab positions for near and far
Ensure your camera is properly calibrated
Practice with intention and focus on one technique at a time
Use Live View or an EVF when things get really challenging
It’s a lot. But I’ve built this to be a journey where you can graduate from one step into the next. Importantly, do the work. Photography is something that truly improves with intentional practice. Reading and studying will arm you with information, but you have to get out there and apply the theory.
My hope, with this guide, is to provide a rich but concise amount of theory that gives you everything you need to master the practice. Good luck.
Previous Guides
May Contest
This month, I’ll be giving away a $200 gift card to the Moment Shop where the winner can save big on their next camera, lens, bag, or courses. Moment has so many creative products to choose from and $200 can absolutely make for a great deal.
How will I pick the winner? Make sure you’re signed up for this newsletter then leave a comment on at least one post from this month. I’ll be randomly picking one person, confirming they meet the requirements and contacting them directly before announcing the winner publicly.
As always, this contest is void where prohibited by law. Good luck!
My thanks to the team at Moment! Not only for this contest but for being the longest supporter of my work online. They’re a lean team of passionate creators that truly believe in supporting other creatives on their journey. Whether it’s a new camera, lens, workshop, or just some great articles, visit ShopMoment.com today.
What’s Next?
For those of you that are subscribers of Church & Street, I’m introducing a few additional emails each quarter. These are super-brief recaps of the books, films, and other types of media that I'm enjoying.
The first page of Contact Sheets drops this Wednesday. Enjoy.
GB
9.5: expect to fail a bunch and be patient. You will be at minimum many hundred images in, probably thousands, before you feel you have this down. I’ve shot rangefinders for years and years and still sometimes feel like I’m improving at focusing.
Phenomenal guide and advice. Thank you!
Photographing a toddler using an M is my goal. Currently balancing between the M & Q343.