

The Ultimate Leica Filmmaking Guide
Mastering Cinematic Footage with Leica Cameras

Filmmaking and video production aren’t topics I plan to discuss often in the Church & Street newsletter. But sometimes, I’ll make an exception because it is a large component of my journey.
Many of the tools I own offer a level of versatility that most users never fully explore. The Leica SL2-S and, now, the SL3-S are perfect examples of that. These cameras are powerful video tools, yet most people barely scratch the surface with their capabilities. If you’re asking me, the reason is simple: the onboarding experience can feel intimidating. I wanna change that.
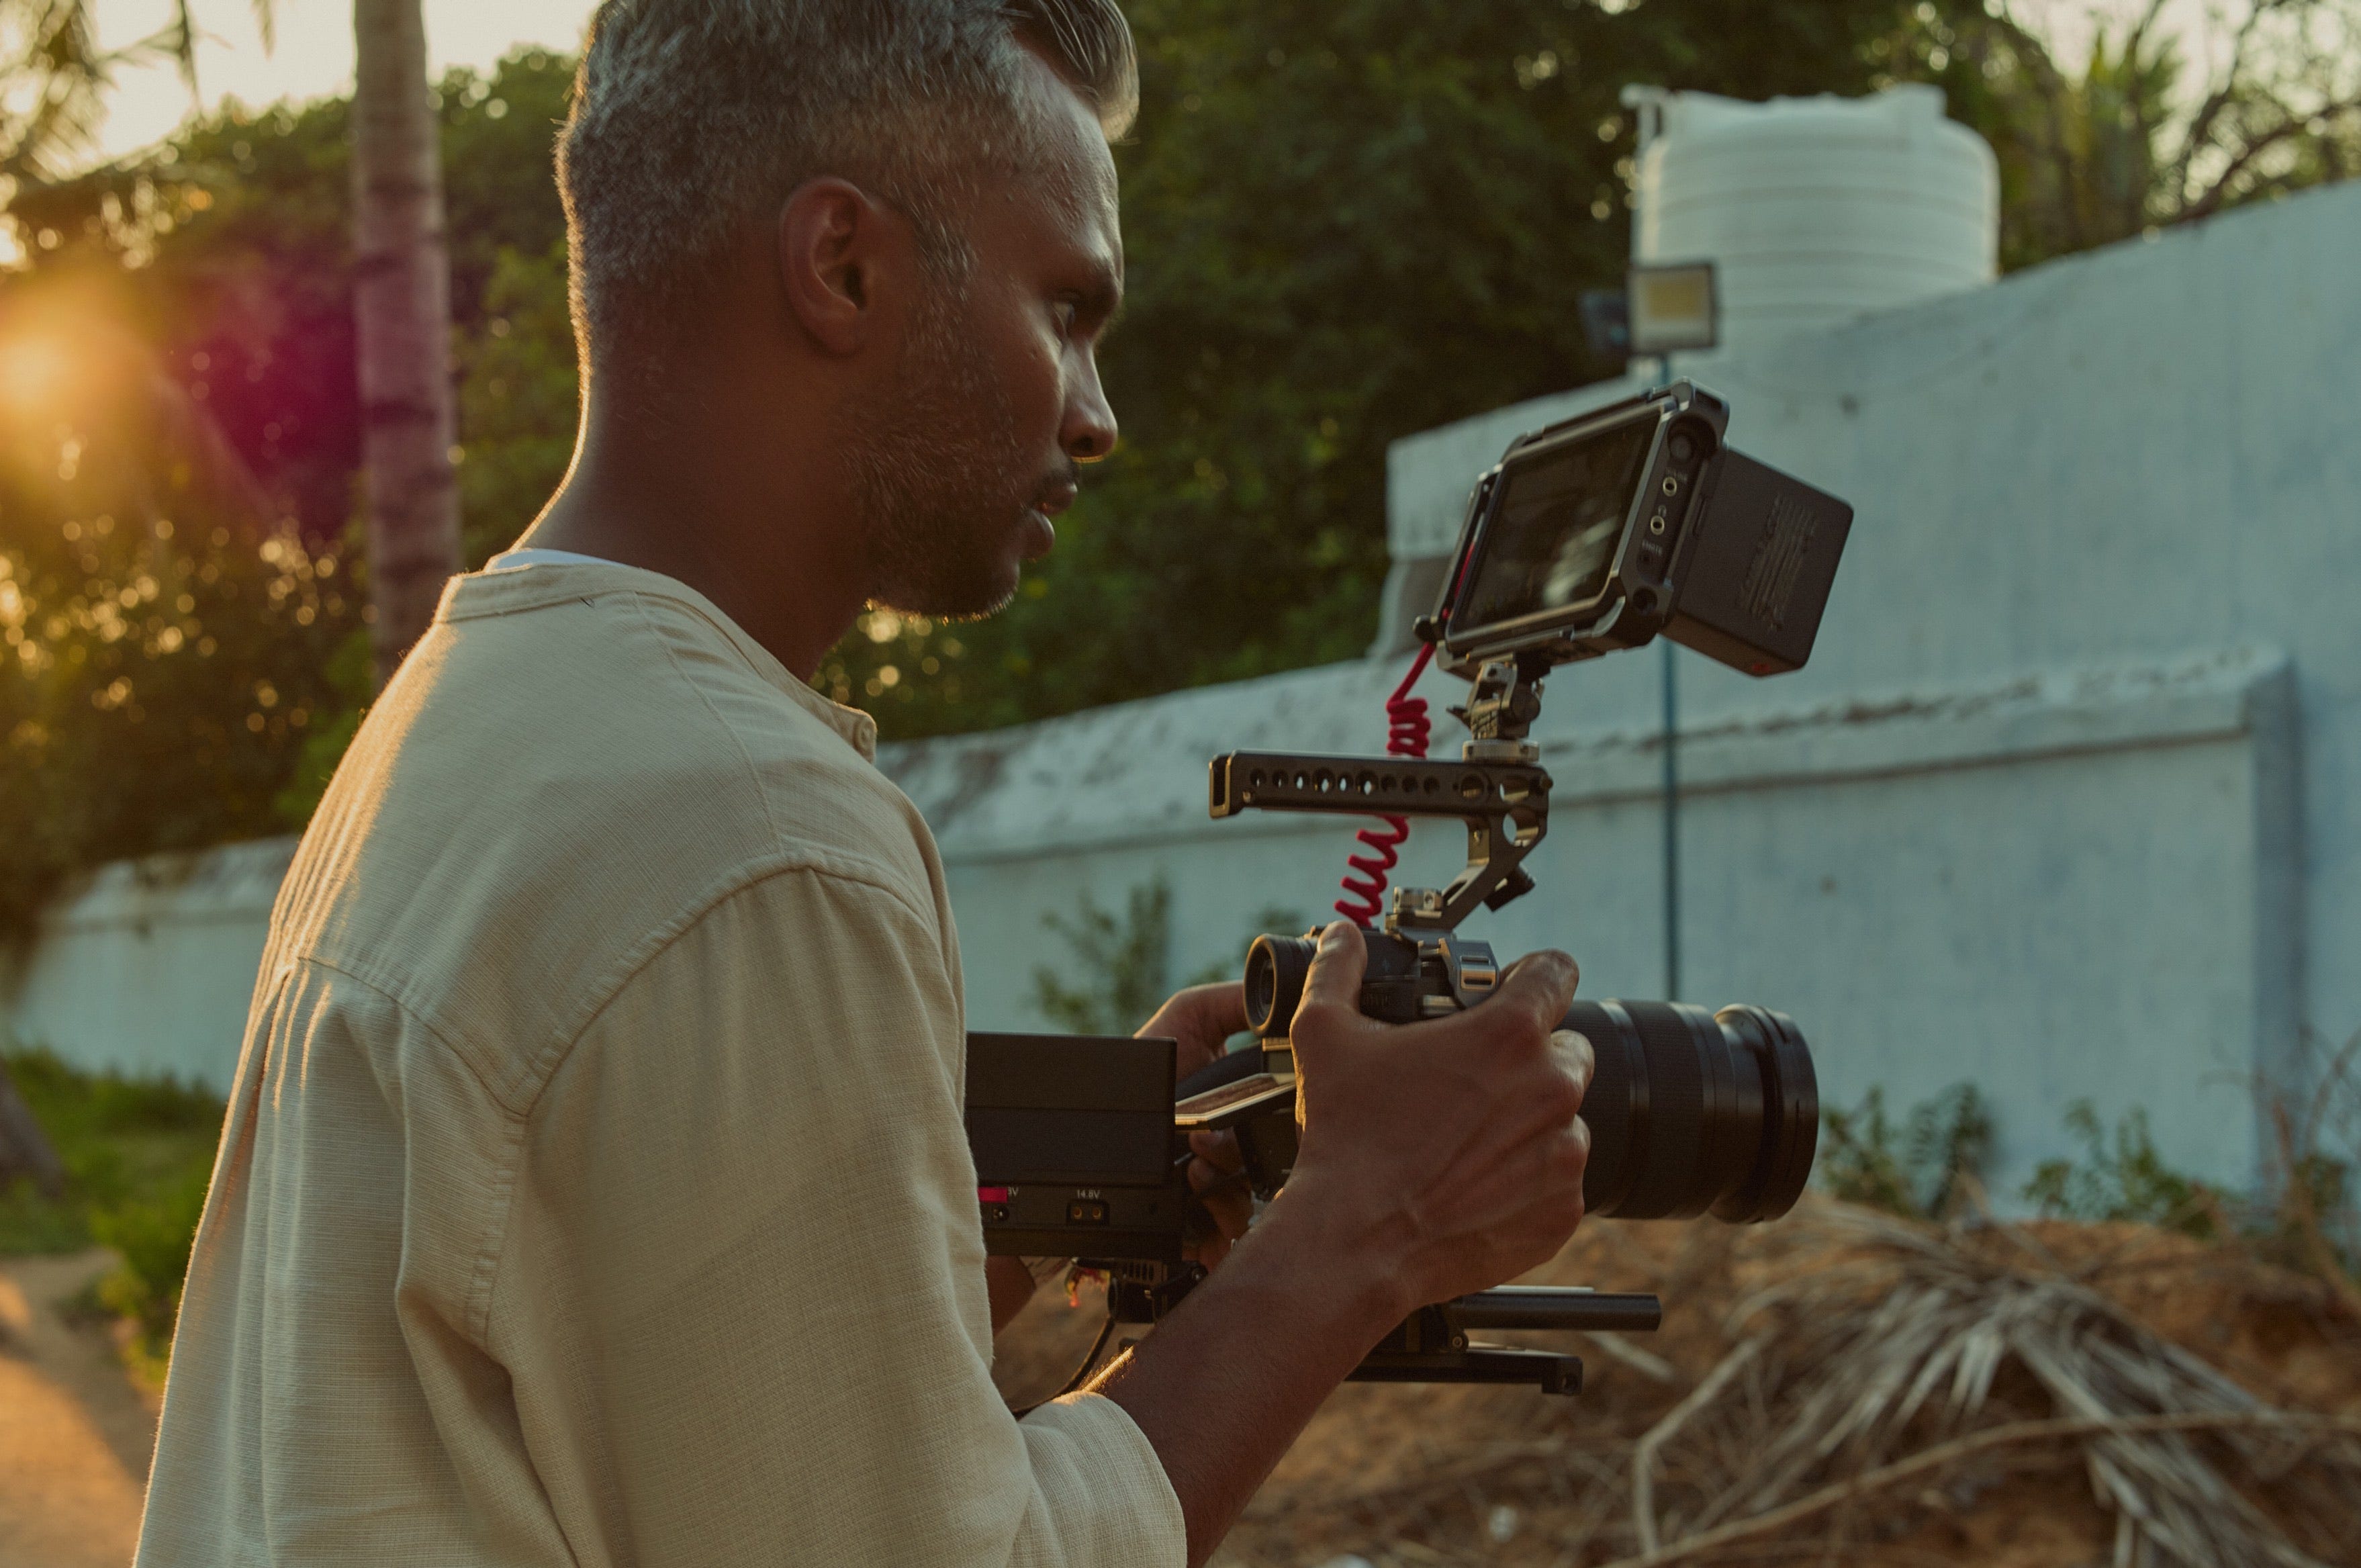
With this guide, I aim to share months of firsthand experience using the Leica SL3-S while creating my film BOUNDLESS for Leica. Here, you’ll learn how to set up your camera for the best results, my go-to accessories, how to achieve optimal exposure, and some advanced techniques to colour grading footage.
UPDATE 05/20/26: Added information on using anamorphic lenses.
UPDATE 12/20/25: With the release of firmware 4.00, User Profiles were updated.
While this guide focuses on the Leica SL3-S, many of the insights will also benefit SL and Q series users. Also, this won’t be a static resource. It’ll evolve over time. My goal is to treat it as a living, breathing document that grows alongside my experiences and serves as a strong starting point for those that wish to get serious about filmmaking with Leica.
Now that you understand the inspiration behind this guide and what you’ll be learning, let’s dive in and start with camera settings.
Setting Up the Camera
Camera Storage
It may seem trivial, but I want to emphasize this early: invest in high-quality storage. I’ve lost count of how many times I’ve seen people use bargain-bin memory cards and expect peak performance. Whether you choose SanDisk, ProGrade, or Sony, make sure you invest in reliable, high-quality storage so that your memory doesn’t become a bottleneck for your camera’s performance.
The Leica SL3-S supports CFexpress Type B and SD cards for storage. If you want to take full advantage of this camera’s capabilities, you’ll need a dependable CFexpress Type B card. Alternatively, the SL3-S also supports external SSDs, allowing you to use up to 2TB SSDs to leverage the same video features you can with CFexpress.
Currently, the only feature that requires an external recorder is RAW recording. If you want to capture ProRes RAW video for maximum colour information and dynamic range, you’ll need an external recorder like the Atomos Ninja V.
For most SL3-S users, I recommend investing in a 512GB SanDisk CFexpress Type B card for reliable performance and durability.
Cine Mode
Within the menus of the Leica SL2-S and Leica SL3-S, you’ll find a toggle for Cine Mode. Activating this feature unlocks several changes designed specifically for filmmakers.
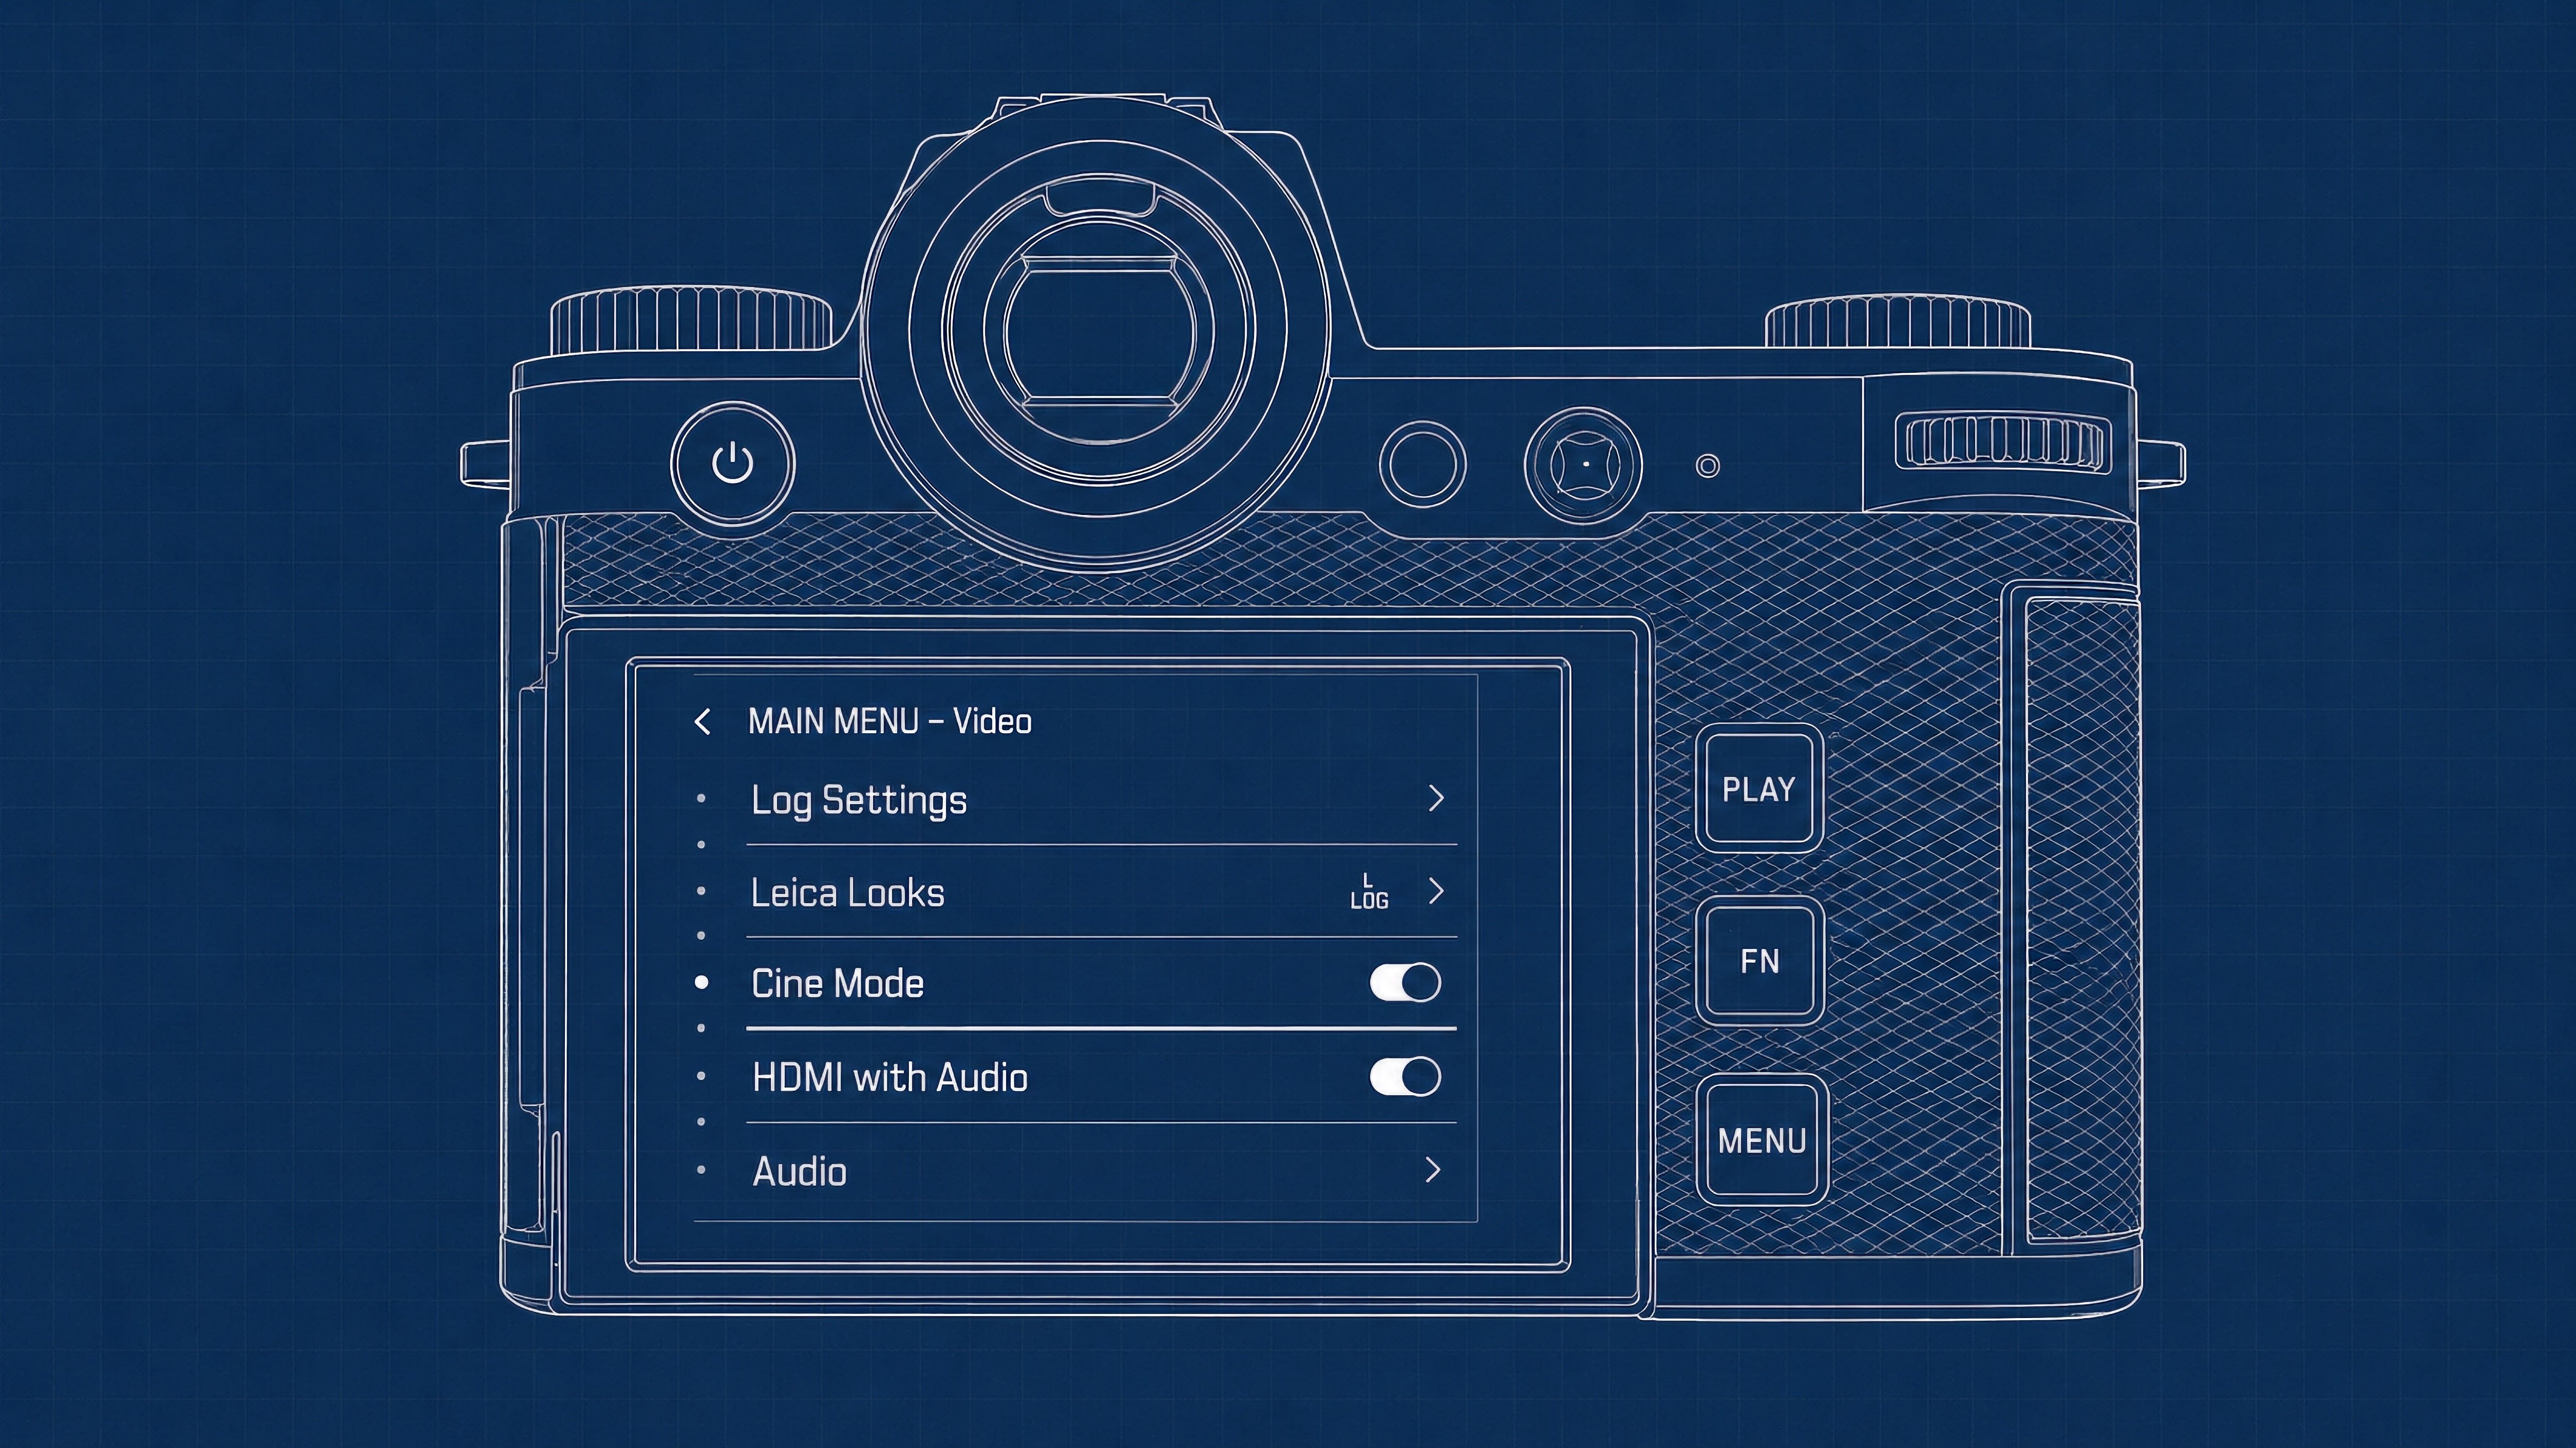
First, you’ll have the option to use shutter angle instead of shutter speed. This allows you to lock a specific angle regardless of frame rate, eliminating the need to adjust shutter speed manually every time you change your frame rate. (Learn more about shutter angle here).
In Cine Mode, ISO is now labeled as ASA. Both are measured the same way, so there’s no new scale to learn. ASA 400 is the same as ISO 400.
Additionally, aperture will be displayed in T-stops instead of F-stops. If you look closely, you’ll notice that your T-stop (when wide open) is a higher number than your lens’s F-stop. This is because T-stops measure actual light transmission, whereas F-stops are a theoretical calculation based on aperture size. For example, an F2.8 lens may appear as T3.3 when fully open in Cine Mode.
Cine Mode also unlocks additional frame rate options, but most importantly, it just creates an optimal environment for serious video work. If you’re looking to grow as a filmmaker with Leica cameras, this is the mode you’ll want to activate.
Shutter Angle & ASA
When it comes to shutter angle and ASA, one is more of a creative choice, while the other has two optimal options for video quality.
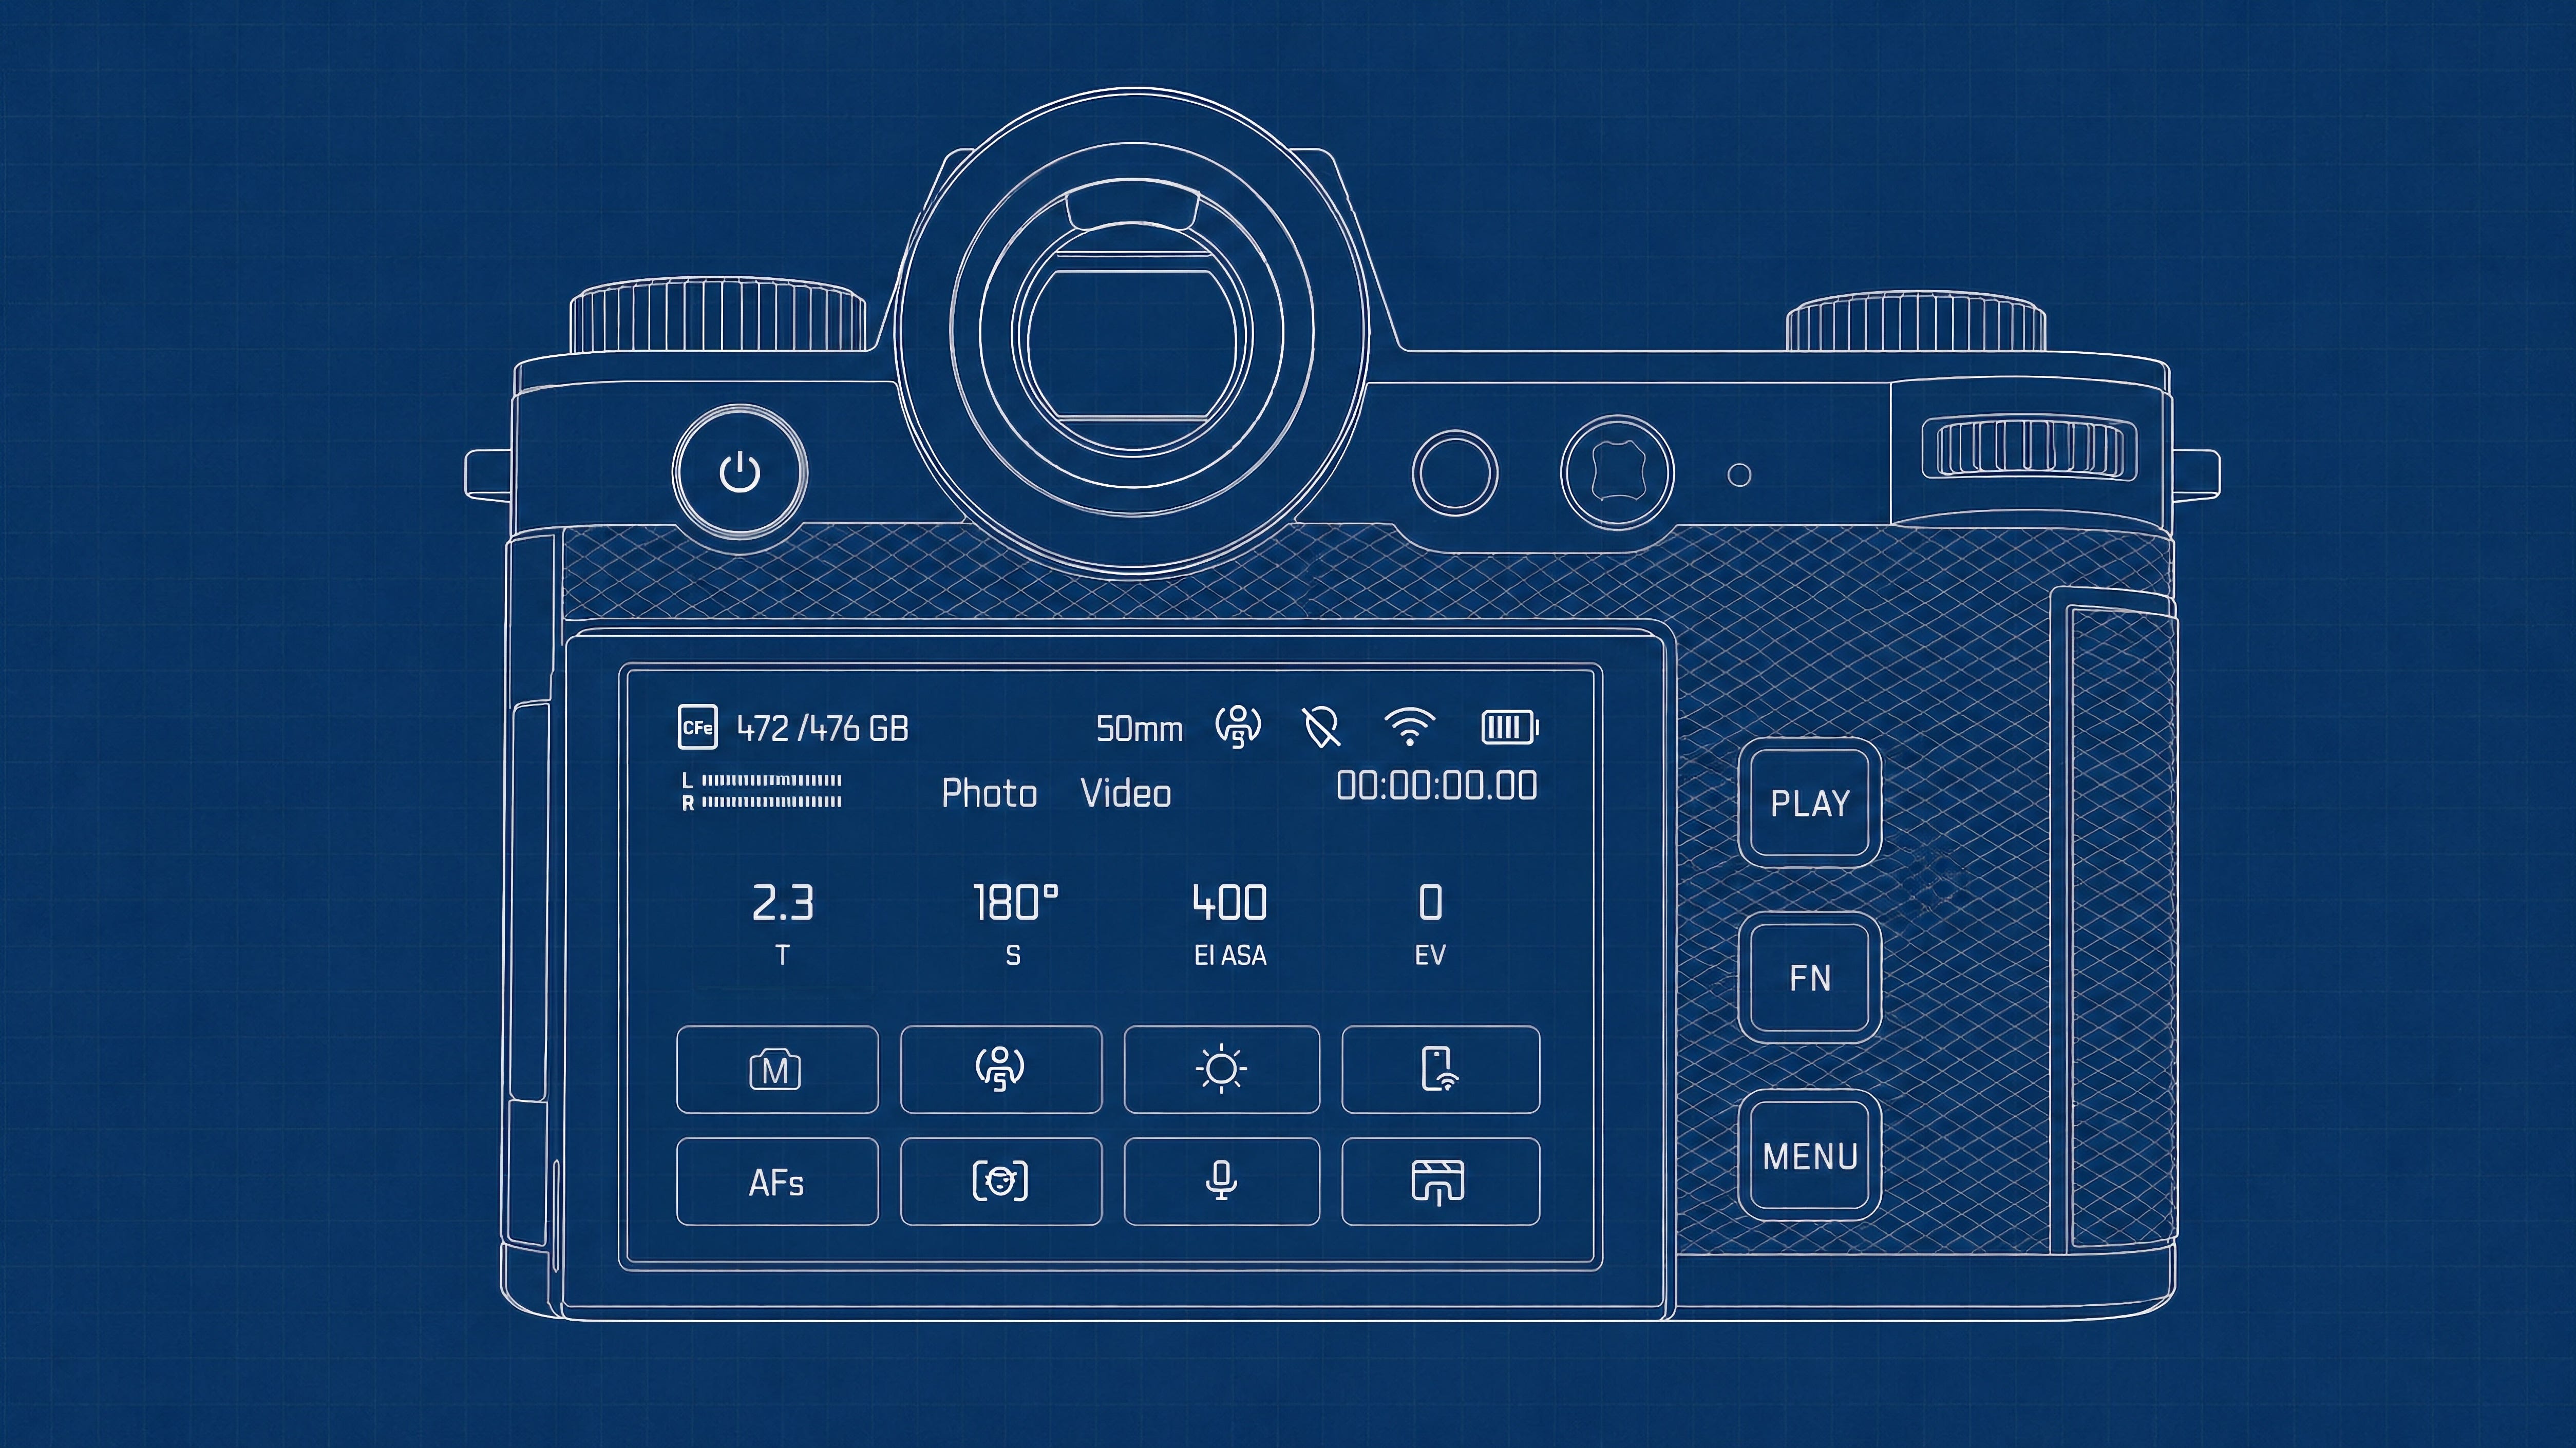
For shutter angle, the ideal setting depends on your frame rate and the look you want to achieve. Generally, a 180-degree shutter angle is the standard for a natural, cinematic motion blur.
If you want more motion blur, increase the shutter angle to 270 or 360 degrees. This can be useful for dream sequences or ethereal, surreal footage.
If you want less motion blur, such as for action scenes or dance sequences, lower the shutter angle to 90 degrees. This results in sharper motion, making the footage feel faster and more intense.
For ASA (ISO), the Leica SL3-S has two native circuits: 400 and 2500. To maximize dynamic range while minimizing signal noise, it’s best to shoot at one of these two settings:
ASA 400 for most environments, providing the cleanest image.
ASA 2500 when shooting in low-light or challenging lighting scenarios.
By keeping these settings in mind, you can achieve cinematic motion and optimal image quality with the Leica SL3-S.
White Balance
Avoid using auto white balance when shooting video. Seriously, don’t do it. In most cases, you won’t be shooting in RAW, which means your white balance is baked into the footage. While modern codecs retain plenty of color information for adjustments in post, it’s best to set the correct white balance from the start. Developing this habit ensures that your footage looks as accurate as possible in-camera, giving you the best starting point for any project.
Video Profiles
With the Leica SL3-S, you can create and save video profiles. These are a collection of up to five custom settings that are instantly accessible in video mode. Below are the four profiles I use most frequently for my work.
Cinema 6K
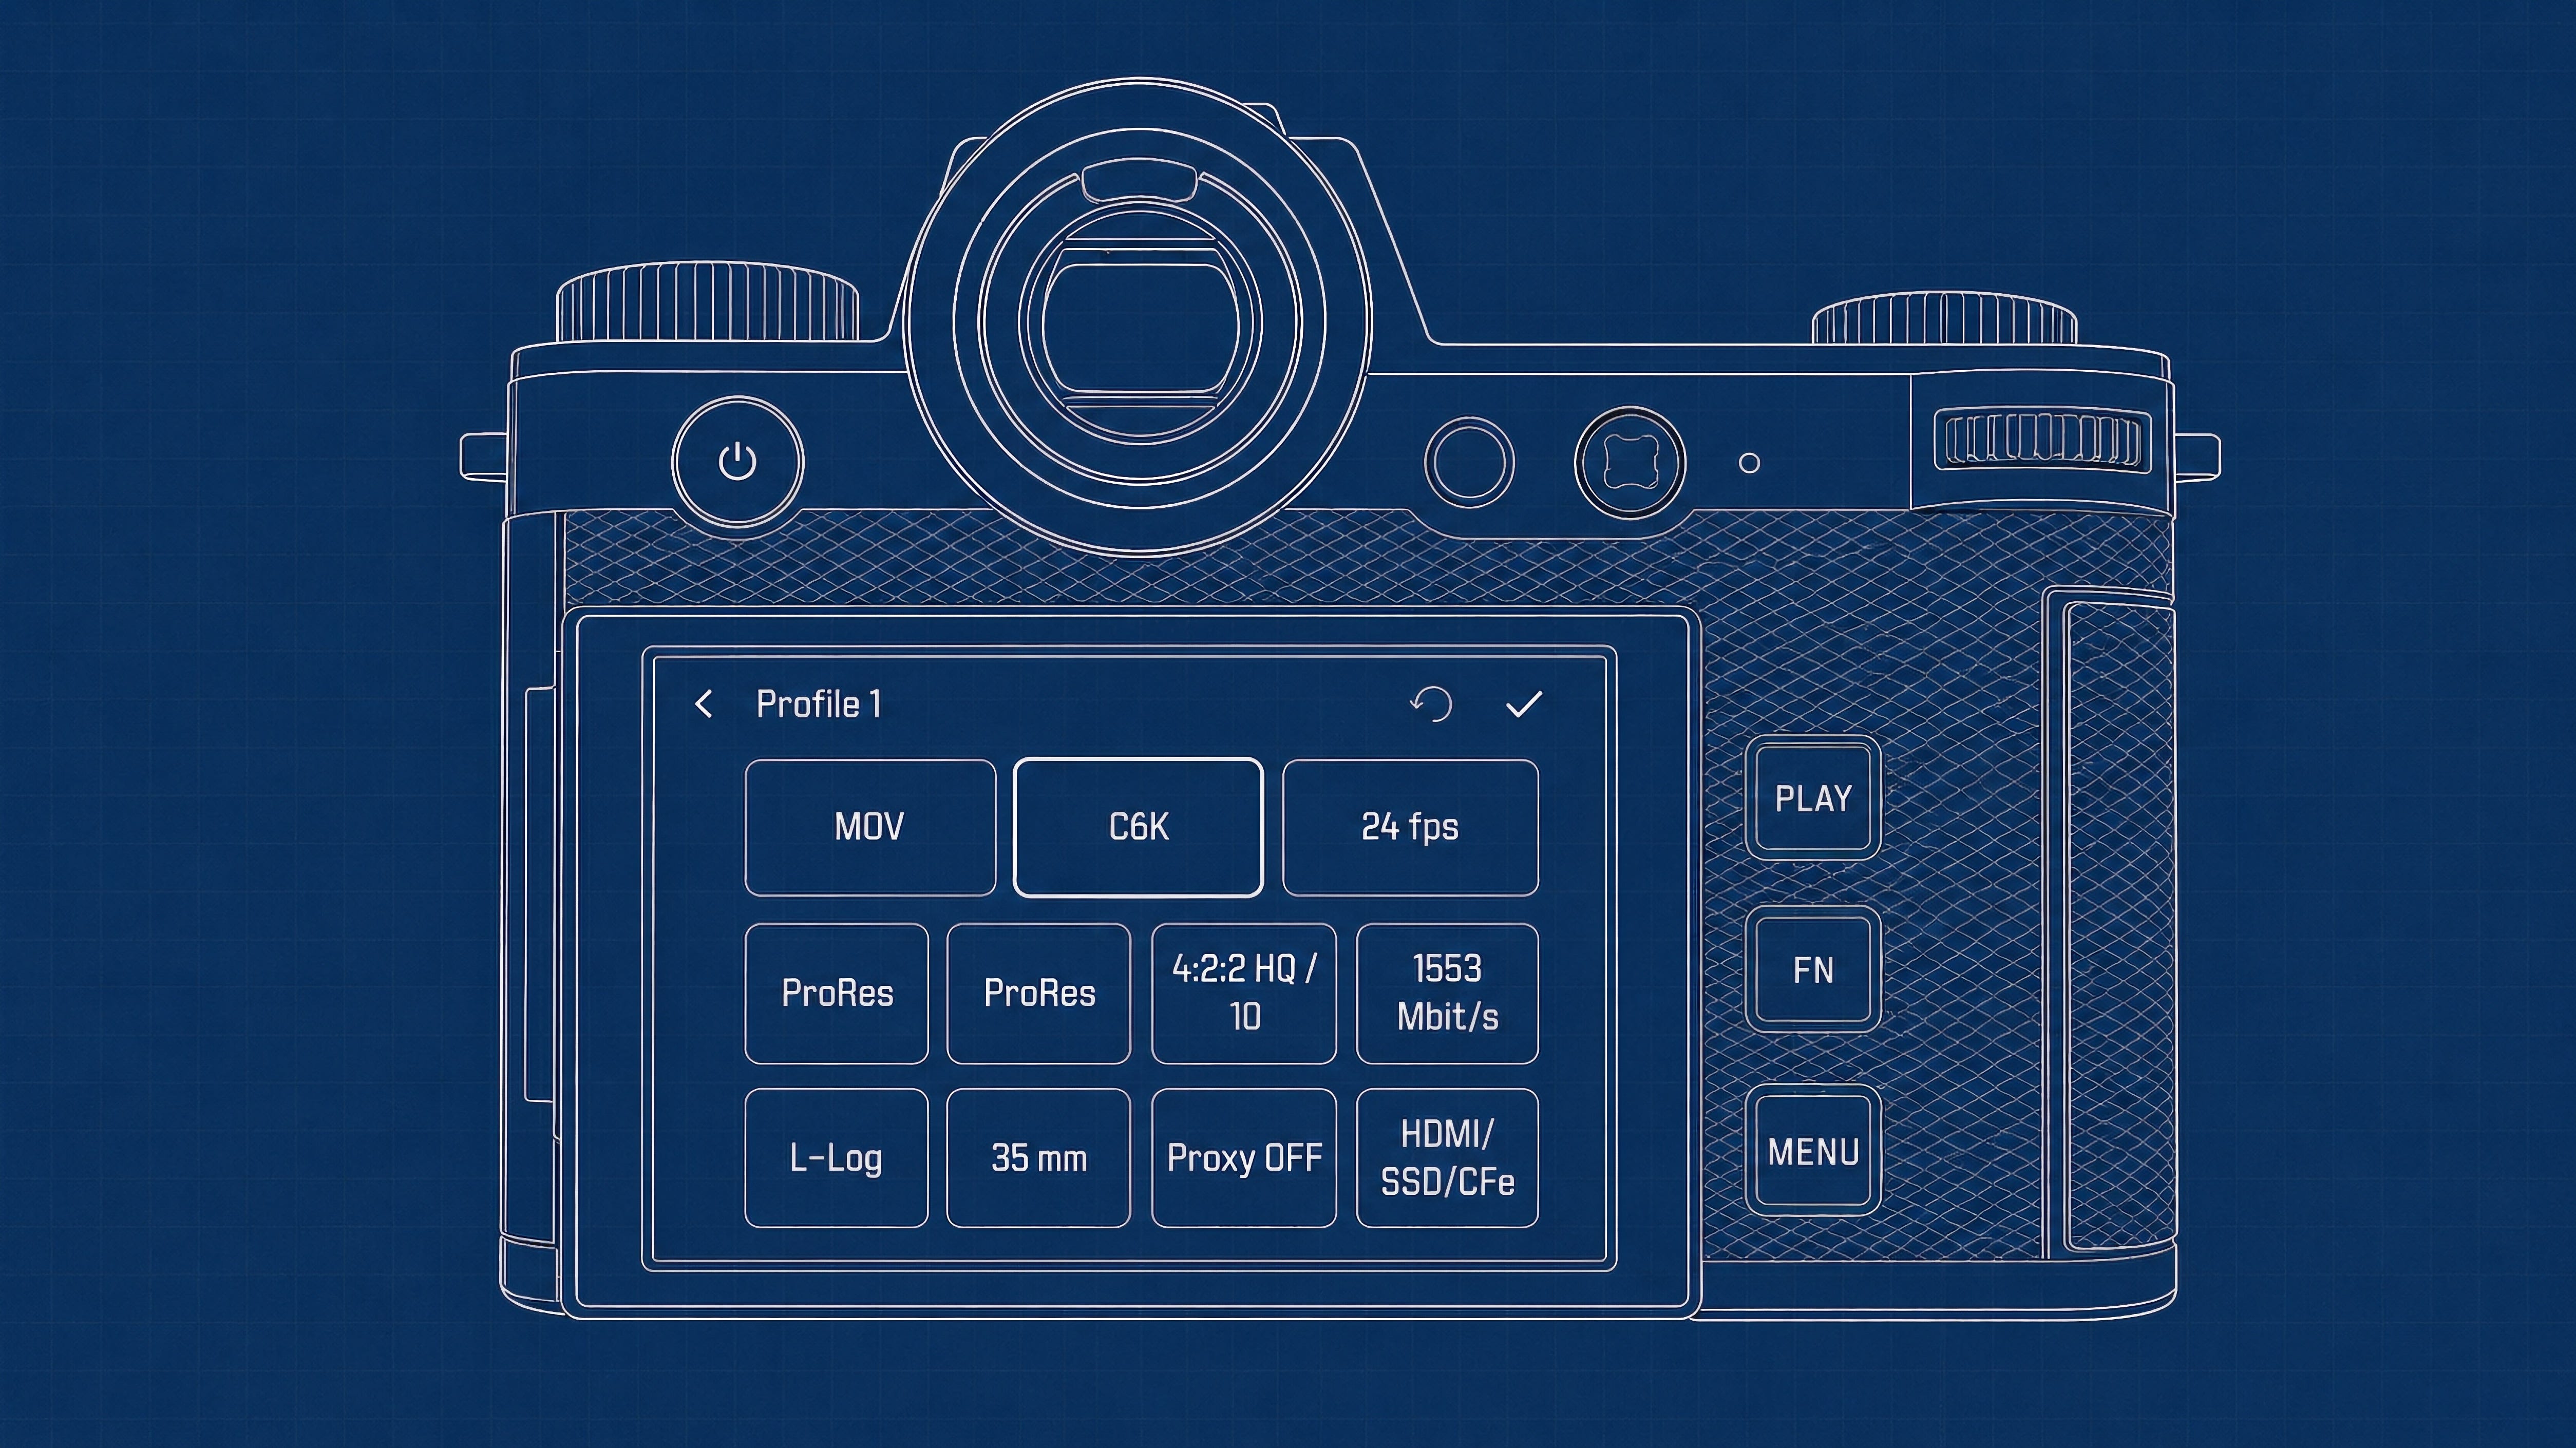
This is my go-to profile. It offers the best combination of colour and dynamic range without requiring an external recorder.
Format: MOV
Resolution: C6K
Frame Rate: 24 FPS
Codec: ProRes
Compression: ProRes
Color Sampling: 4:2:2 HQ 10-bit
Bitrate: 1553 Mbit/s
Log Profile: L-Log
Sensor Ratio: 35mm
Proxy: Off
Recording Options: HDMI / SSD / CFexpress
Open-Gate
I use this profile for social media content and low-stakes deliverables. While it sacrifices a bit of quality, it provides a significant increase in vertical resolution, making it useful for stabilization, recomposing, and editing in post.
Format: MOV
Resolution: 6K Open-Gate
Frame Rate: 24 FPS
Codec: H.265
Compression: L-GOP
Color Sampling: 4:2:0 10-bit
Bitrate: 200 Mbit/s
Log Profile: L-Log
Sensor Ratio: 35mm
Proxy: Off
Recording Options: HDMI / SSD / CFexpress
Slo-Mo
The Leica SL3-S supports slow motion recording up to 120 FPS in Full HD, but I prefer filming at 60 FPS with higher resolution for my projects, where I’ll slow the footage down in post-production. This profile applies an APS-C crop, which often works to my advantage in storytelling with slo-mo shots.
Format: MOV
Resolution: C4K
Frame Rate: 59.94 FPS
Codec: ProRes
Compression: ProRes
Color Sampling: 4:2:2 HQ 10-bit
Bitrate: 1944 Mbit/s
Log Profile: L-Log
Sensor Ratio: APS-C
Proxy: Off
Recording Options: HDMI / SSD / CFexpress
RAW Recording
ProRes RAW recording gives users to adjust white balance, ISO, and exposure in post. The ProRes format is limited to Adobe Premiere and Final Cut Pro at the moment, making it limiting for my personal workflows. But there may be some benefits depending on the environment.
Format: RAW
Resolution: 6K
Frame Rate: 25 FPS
Bit Depth: 12-bit RAW
Log Profile: L-Log
Sensor Ratio: 35mm
Proxy: Off
Recording Options: HDMI
I don’t shoot in RAW often, but when capturing scenes with extreme dynamic range, I’ll switch to this format, provided I have an external recorder. I’m still figuring out whether the benefits of RAW outweigh those of my C6K profile. So far, the advantage appears marginal, but it could be useful for high-contrast scenes with deep shadows and bright highlights.
L-Log Settings
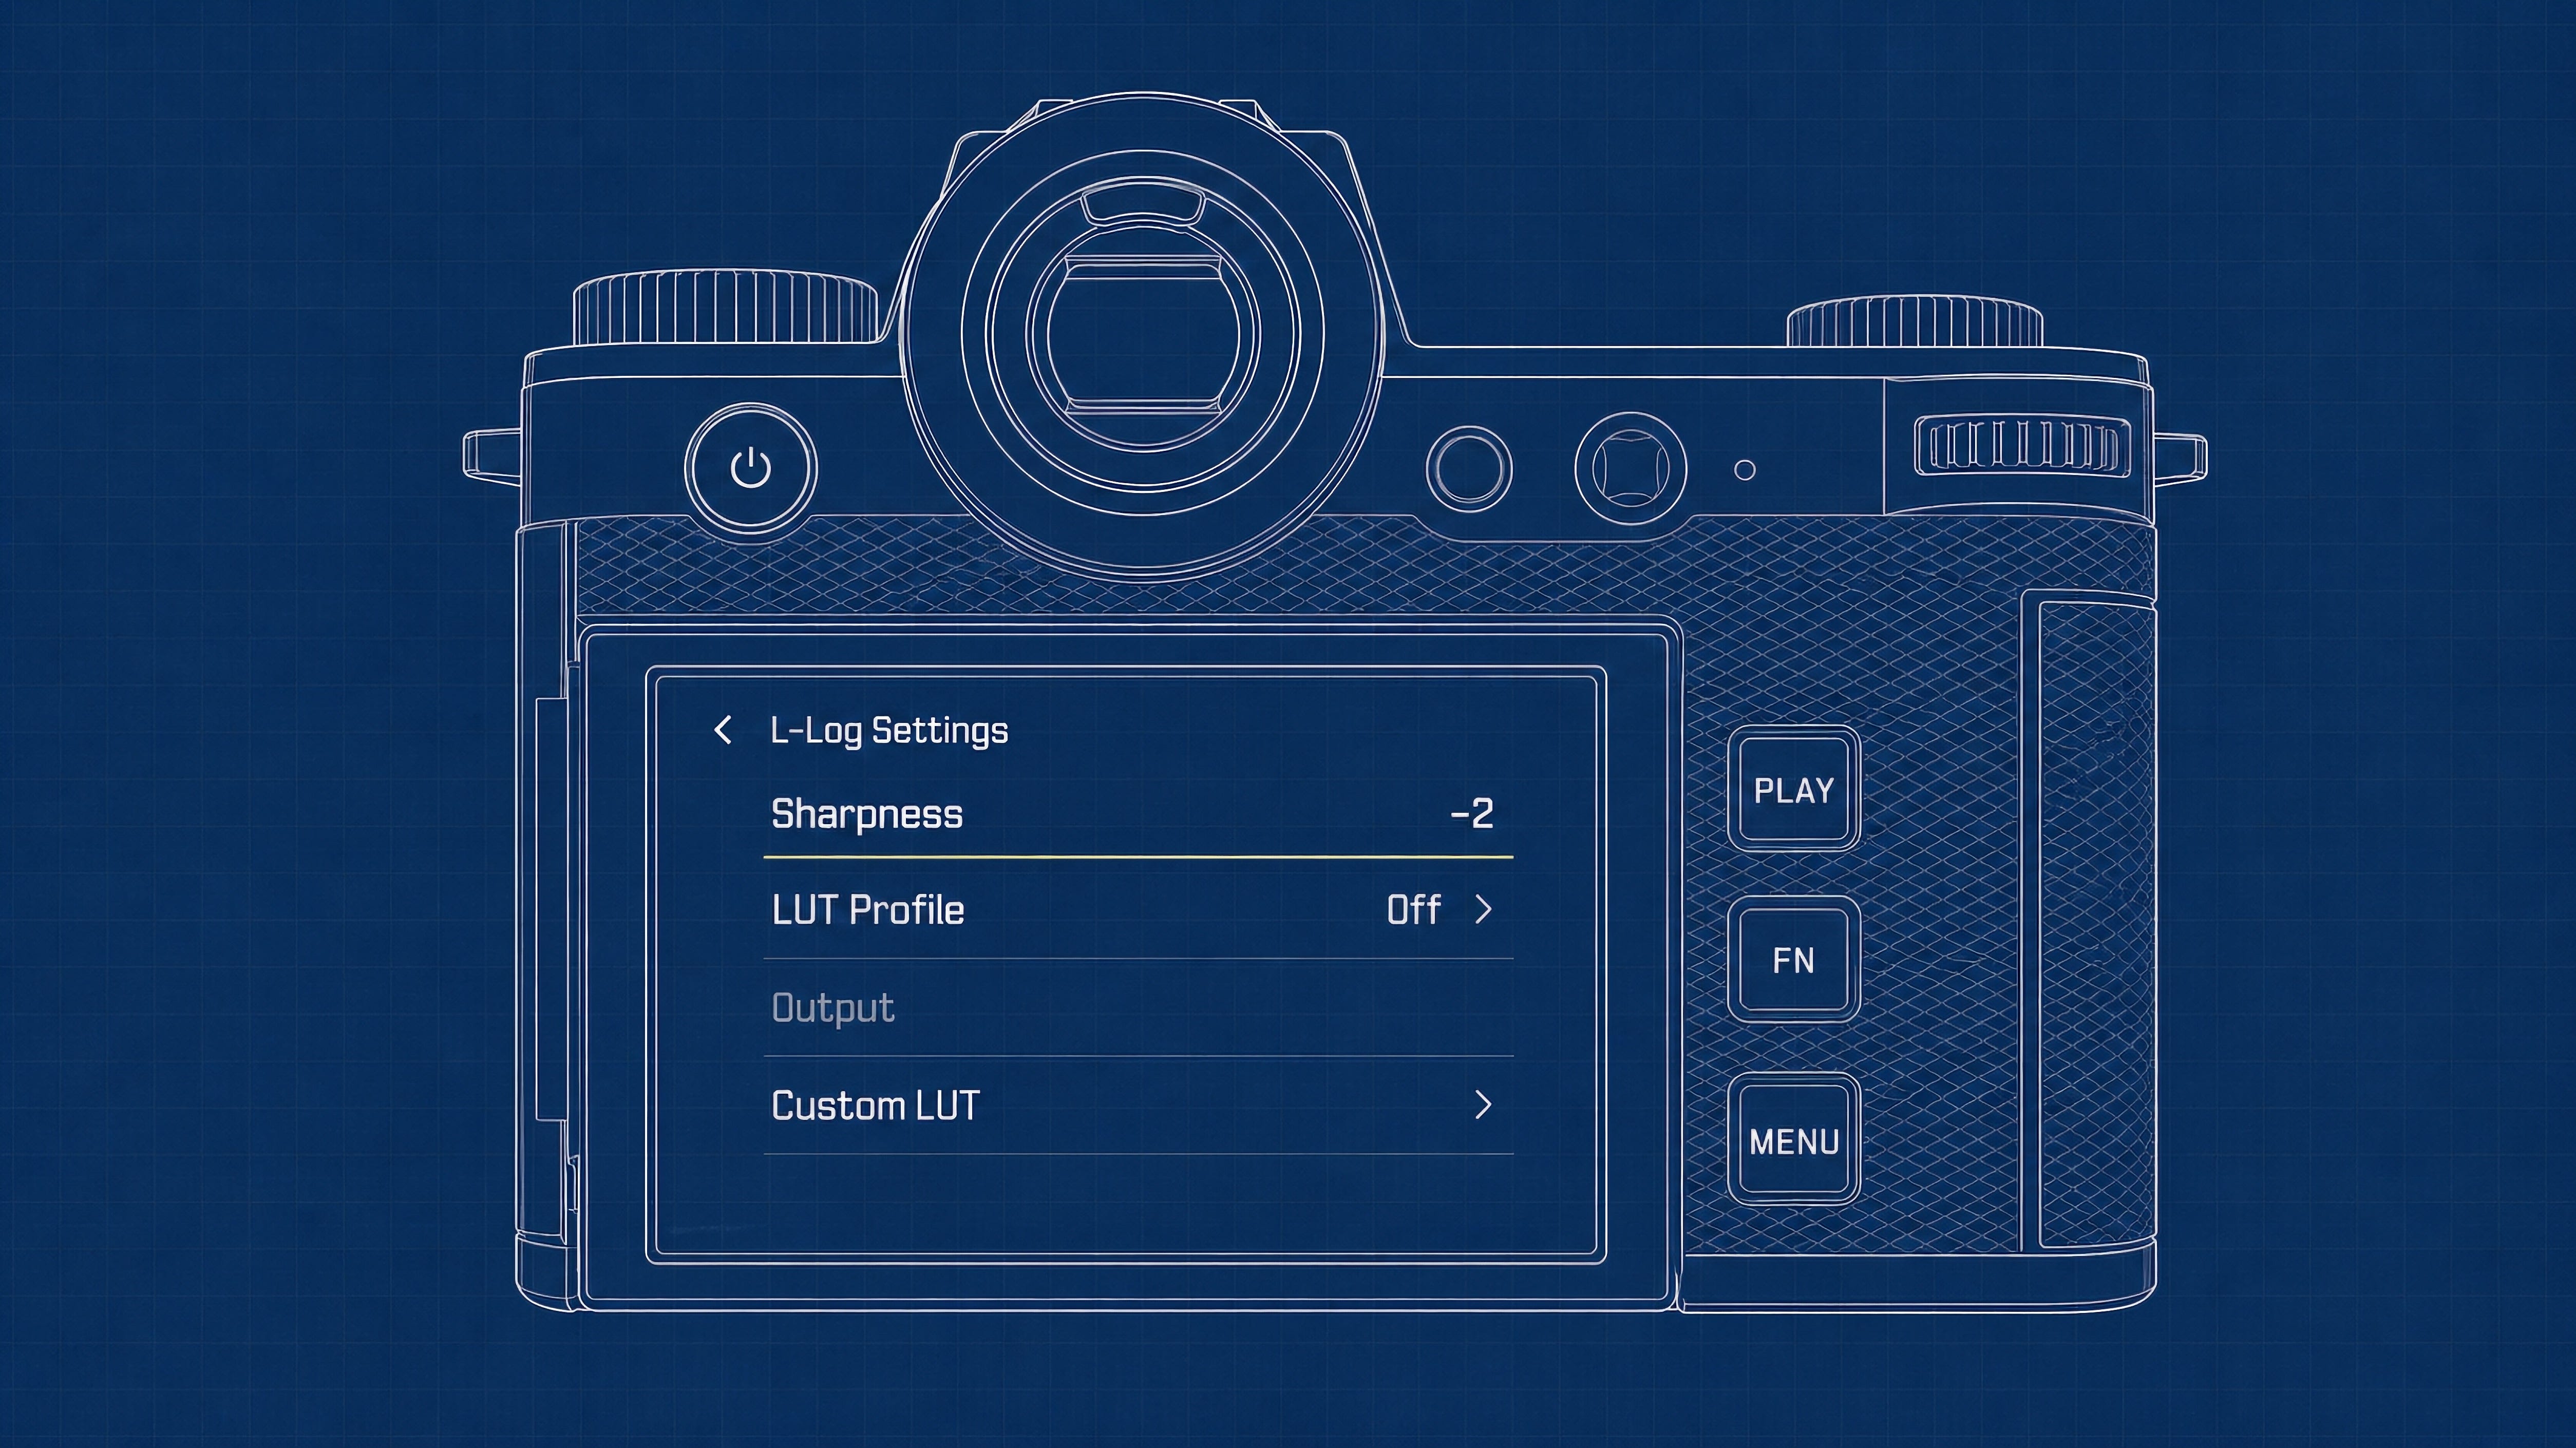
Shooting in L-Log produces a flat image with maximum dynamic range. In this mode, I set in-camera sharpness to -2 and use the Leica Classic LUT for exposure preview. Sharpening should be done in post-production so it’s user controlled, and LUT preview allows you to get a decent understanding of what you’ll be colour grading later. You can also load custom LUTs into the camera, which I plan to discuss once I’ve fine-tuned my own LUT for the SL3-S.
Wind Reduction
Many cameras include a wind noise reduction feature, but I find it best to handle noise reduction in post-production for better control over the final sound. Under the audio settings, I recommend disabling wind reduction and manually adjusting your microphone gain to prevent clipping and distortion. A good starting point for the gain is -6dB, but I always fine-tune it based on the recording environment.
Segmented Video
This feature splits your recording into one-minute clips. I usually keep it off, but for longer recordings, I’ll enable it as a safety measure. If something goes wrong, only one minute of footage is lost instead of the entire clip. While I don’t use this feature often, it’s helpful for podcasts and interviews where I have some peace of mind in case of unexpected issues.
Recording Frame
Turning the recording frame on feature on will introduce a red border appear around the rear LCD when you are recording. It’s a great indicator that your camera is a rolling. Turn it on.
Image Stabilization

This one is tricky. The image stabilization on the Leica SL3-S is excellent in many situations, and I’d say most users should leave it on. However, I prefer to keep it off and only enable it when I need the extra support. Certain camera movements can counteract the in-body stabilization, introducing jitter into some shots. If you’re shooting narrative work or executing specific camera movements, consider turning this setting off to start.
Waveform
In the Capture Assistants menu, you can customize display options while recording video. I set up three different views:
A clean display with no overlays.
A basic settings view with focus peaking enabled.
A 3x3 grid overlay with a 9x16 frame guide for vertical video.
For the last two, I will also enable the waveform display. The waveform graph provides a simple way to monitor exposure. I’ll cover proper exposure in more detail later, but in short, you want to ensure that important details aren’t clipped at the top or bottom of the graph. It’s a more informative visual aid than a typical histogram.
Camera Shortcuts
If you’re asking me, Leica has the easiest way to customize camera controls. You can press and hold any one of the blank buttons and then select a desired shortcut. Below is a list of the shortcuts I have designated for video recording:
Back Fn Button: User Profile Selection
Top Right Fn Button: Focus Peaking On/Off
Top Left Fn Button: Magnification On/Off
Front Top Fn Button: Dial Lock On/Off
Front Bottom Fn Button: Toggle AF/MF
User Profiles
Now that my camera setup is dialled in, I’ll save four user profiles for quick access. User Profiles are incredibly useful because they store every custom setting and shortcut to a specific profile, even down to the file naming. Here are the profiles I have set up for video:
C6K ProRes
C6K video profile
ASA 400
180-degree shutter angle
Autofocus ON (continuous eye/face)
6K OG
6K OG video profile
ASA 400
180-degree shutter angle
Autofocus ON (continuous zone)
C4K Slo-Mo
Slo-Mo video profile
ASA 400
180-degree shutter angle
Autofocus ON (single point)
C6K Low Light
C6K video profile
ASA 2500
180-degree shutter angle
Manual Focus
With these profiles, I can simply press the back Fn button and switch to the best profile for the scene, saving time and keeping me focused on filming. Instead of diving into menus, I get to instantly access my go-to settings. Again, User Profiles are a powerful tool, especially in unscripted environments, where speed and adaptability are key.
Anamorphic Lenses
With the upgrade to Firmware 4.00, the modern Leica SL cameras have display support for anamorphic lenses. A lens of this kind is designed to squeeze more information onto the sensor, which can then be de-squeezed for a wider aspect ratio in your edit. They also bend and refract light in beautiful ways.
First, you’ll need an anamorphic lens for the Leica L-mount or an anamorphic lens that you can mount with an adapter. Once you’ve mounted the lens on the camera, navigate to the Lens Profile located under Camera Settings.
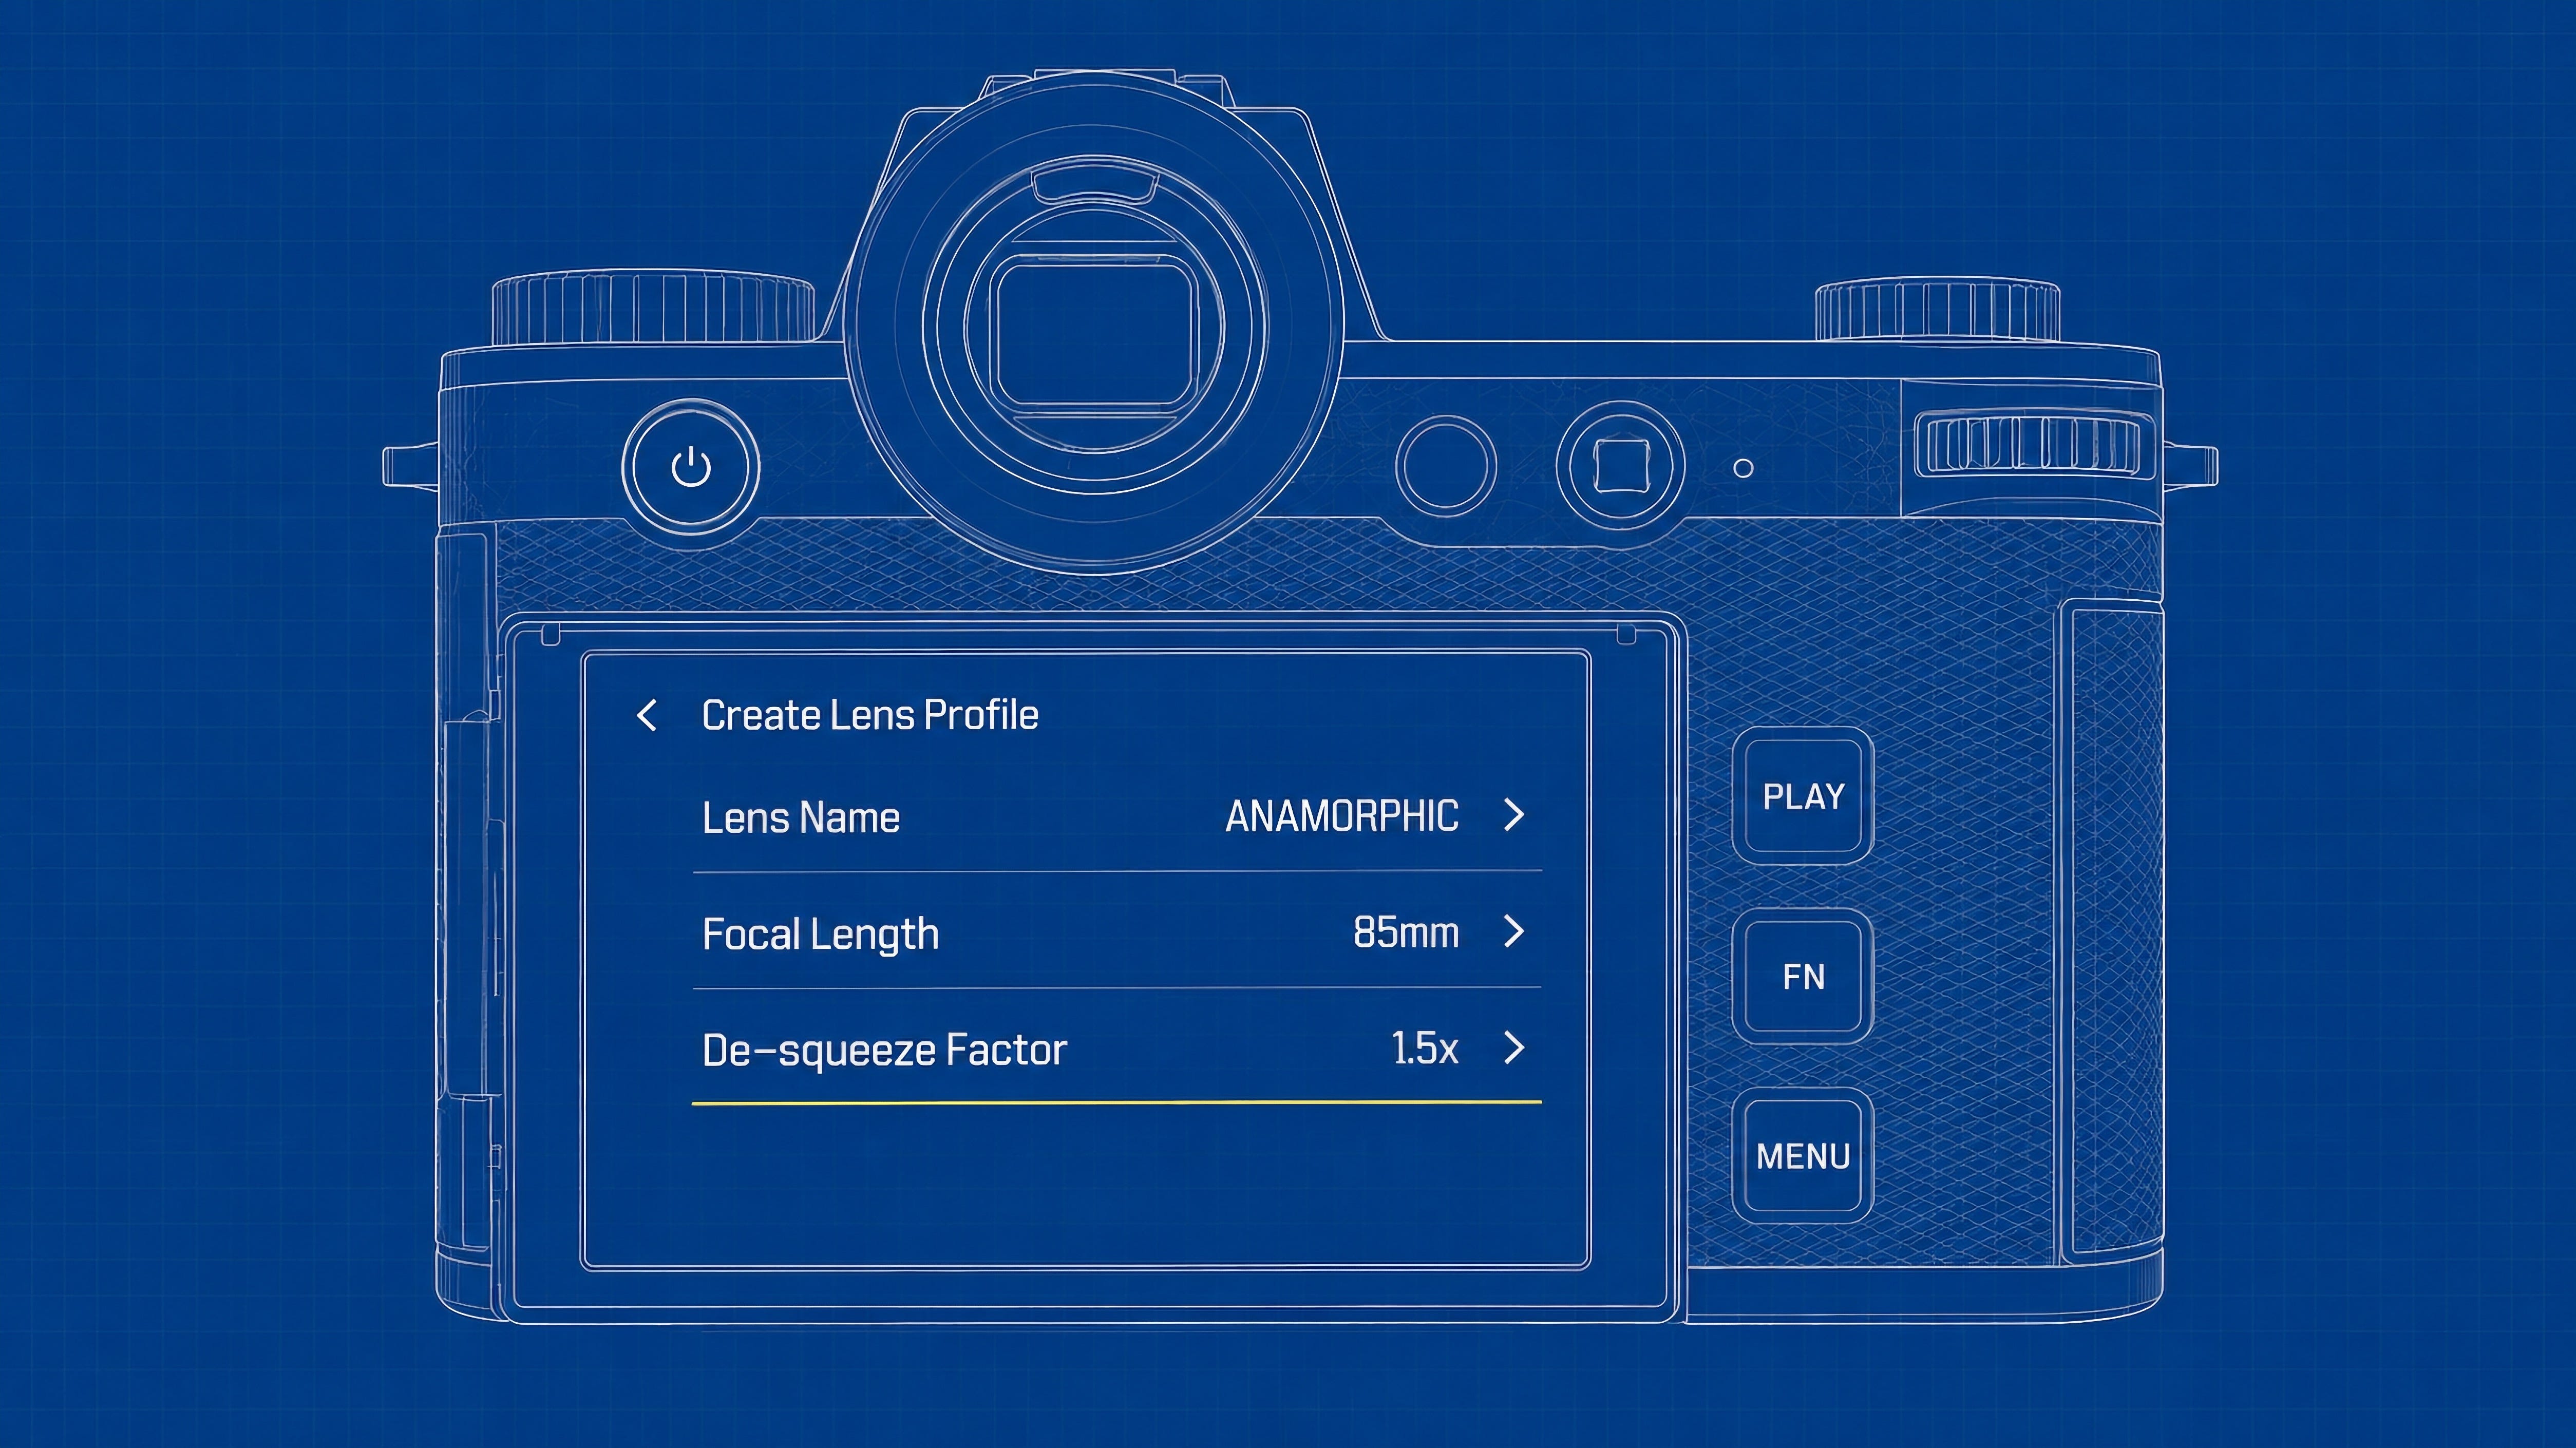
In this menu, you can selected Anamorphic Lens then input the focal length and de-squeeze factor. Once you’ve saved these settings, you’ll now see the de-squeezed footage during record. Like most cameras, this does not de-squeeze the footage in camera. You’ll need to do that in editing. But it’s great to see this feature available in Leica cameras.
Outfitting the Camera
Lenses
When choosing a lens, I always consider the story I’m trying to tell. I start by asking myself, “What am I trying to create?” and then select the lens that will best achieve that vision. That said, these are the three lenses I use most often:
Filters
I highly recommend ND filters. Since shutter angle and ASA (ISO) are fixed for consistent results, an ND filter allows you to control exposure while keeping aperture a creative choice, especially in bright conditions. For most situations, I’ll use a Polar Pro or HOYA 2-5 stop VND. In more professional settings, I opt for a matte box solution for greater control.
Cages & Rigging
A camera cage allows you to attach handles, power solutions, and other accessories, expanding the Leica SL3’s versatility for filmmaking. Currently, the SmallRig cage is the only available option for the SL3 series but hopefully, Kondor Blue will release one in the coming months.
When building out a rig, I typically start with a top handle and monitor mount, followed by a side handle for added control. For extended shooting, such as documentaries, I add a wider baseplate and a V-Mount adapter for high-capacity batteries. This setup makes the rig larger but more robust, allowing me to film for hours while staying mobile. Not everyone will need this level of customization, but it’s great to see that the Leica SL3 family has the flexibility to evolve into a fully equipped filmmaking tool.
External Monitor
If you plan to shoot a lot of video with the Leica SL3-S, I highly recommend investing in an external monitor—ideally one with recording capabilities. I’ve been using the Ninja V for nearly five years, and it remains a reliable and feature-packed monitor that continues to receive updates to this day. Both the Ninja V and the newer V+ model offer recording functionality, including ProRes RAW support.
However, the real value of an external monitor lies in better exposure control. With larger waveforms, advanced peaking, and false colour support, the Ninja V provides not just a bigger viewing experience, but also a more accurate one. Features like false colour allow for precise exposure adjustments, ensuring your scene is properly lit and balanced. If you’re serious about video production with your Leica, a high-quality external monitor is a worthwhile investment.
Correctly Exposing for L-Log
When working with Leica cameras and shooting in L-Log, the key to achieving the highest image quality is to feed the camera as much light as possible—but in a controlled way. Specifically, you should slightly overexpose your footage without clipping important details in the highlights.
Early in my Leica journey, I made the mistake of underexposing my footage, thinking I could lift the shadows in post-production. While L-Log does provide excellent shadow recovery, this approach introduces noise and limits colour accuracy. It meant that I was doing more work to get the footage to look the way I wanted. Instead, the best practice is to overexpose slightly, ensuring a cleaner image with more usable colour information across the dynamic range.
So, how much should you overexpose? There isn’t a single fixed value for overexposure, as it depends on the scene and lighting conditions. However, a good general rule is to aim for 1 to 2 stops overexposed in ideal conditions. This technique, sometimes called ETTR (Expose to the Right), helps retain maximum colour data and detail in the image.
L-Log is designed to preserve highlights better than shadows, meaning that slightly overexposing your footage will give you a wider colour gamut and cleaner details when grading in post. This may feel counterintuitive at first, but “feeding the camera” more light ensures that you start with the best possible image, making colour correction and grading much easier later.
By following this approach, you’ll get the richest colours, the cleanest shadows, and the most dynamic range from your Leica footage.
Colour Grading in DaVinci Resolve
Alright, if you’ve been reading up to this point you would’ve noticed that things have gotten progressively more advanced. Well, we’re gonna jump into the deep end with this. I’m gonna share with you my colour grading process in DaVinci Resolve. While programs like Final Cut, Premiere, and even CapCut can land a great look with L-Log footage, I much prefer Resolve for its ability to get granular with colour management.
First, I’ll jump into the settings and colour management tab to ensure I have the correct spaces to manage the incoming footage. This is what the page should look like.

What these settings translates to is that I’ll get to use a very wide colour space to manage colour (DaVinci Wide Gamut) and then export into a space that’s most commonly used for viewing content on the web (Rec.709 Gamma 2.4).
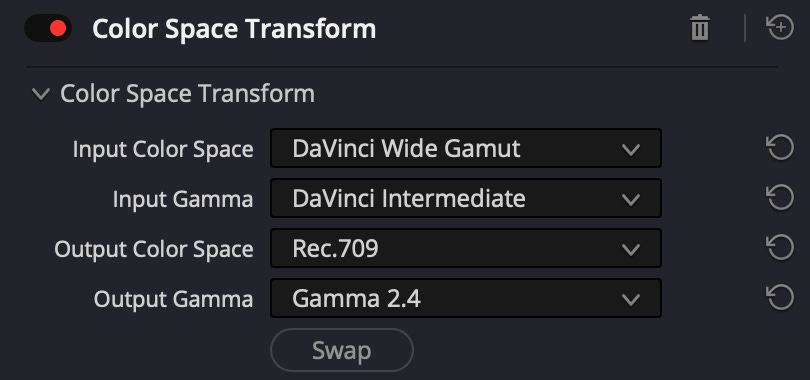
Moving to the grading process, my first node will be a colour space transform that takes the L-Log information and maps it to the DaVinci Wide Gamut colour space. Think of this as taking all that colour information and translating it across a more ubiquitous colour space, which is especially useful if you’re using a variety of cameras.

From here, I’ll jump to my last node, which will be a colour transform out to my final format. Here, I’ll have the transform go from DaVinci Wide Gamut into the Rec.709 Gamma 2.4 format for final delivery.
These two nodes will take my footage, if exposed correctly, to a very good starting point. From here, I can start adding nodes in between these two and develop my overall look. Where I go from here can be as simple or complex as needed. Colour grading is more art than science, but there are rules to follow for optimal results. I’ll dive deeper into this when I discuss my node tree.
Let’s say I want to use a specific conversion LUT for my footage, like the ones that Leica provides, I’ll adjust my last node to transform into Rec.2020 in the Cineon Gamma and follow this up with another node that has the desired LUT applied.

What this does is change how the final colour interpolation is being handled. Instead of Resolve making the final call, we’re using the Leica LUT to map colours into the Rec.709 colour space. Here’s the thing, the “right” way to do this is choose L-Log under the Output Gamma instead of Cineon. However, I’ve found in my testing is that Cineon Film Log—which is most commonly used for developing film looks in Resolve—creates a slightly brighter/flatter starting point for grading. It’s something that I prefer for most situations. This is what I’ve been using when the job calls for a transformation LUT to be used.
Once you’ve decided which of the above two methods works for you, you can start to add nodes in between to colour grade your footage. Again, this can be as simple or complex as needed. Below is the most common node tree that I’ve been using lately. I should also say, pre- and post-group clips can and should be used to clean up your node trees. I've decided to skip that for this guide for the sake of clarity.

After the first colour space transform, I’ll have three basic adjustment nodes for exposure, contrast and saturation.
Next is a collection of 3-4 parallel nodes for more granular adjustments around dynamic range and colour.
This is followed by another collection of parallel nodes to manage subject and background colour, as well as managing vignettes.
I’ll add one adjustment node after this for tweaking any changes I've made up until this point.
Noise reduction, sharpness, and grain nodes are near the end and these components are desired to control the texture of my footage.
Finally, a single or compound node will be placed before my colour space transform with my creative LUT. This node will be placed after my colour space transform if I’m using a transform LUT.
I’ve done my best to make this as coherent as possible but if you have any specific questions, let me know in the comments. I’ll be producing a video on this in the future that should help users garner a deeper understanding of colour grading L-Log footage.
Upcoming Events & Workshops
Leica Akademie: Video for Photographers - London
This June, I’m leading a two-day workshop in London for photographers who want to learn video. Whether you’re looking to create short films, branded content, or simply elevate your visual storytelling, this workshop provides a practical introduction to filmmaking. Sign up here.
Seats for my 2026 India workshop are currently sold out. If you’re still interested, you can join the waitlist here to be notified if a spot opens up or when new dates become available.
Previous Guides
February Contest
This month, I’ll be giving away another $300 gift card to the Moment Shop where the winner can save big on their next camera, lens, bag, or courses. Moment has so many creative products to choose from and $300 can absolutely make for a better deal.
How will I pick the winner? Make sure you’re signed up for this newsletter then leave a comment on at least one post from this month. I’ll be randomly picking one person, confirming they meet the requirements and contacting them directly before announcing the winner publicly.
Once again, this contest is void where prohibited by law. Good luck!
My thanks to the team at Moment! Not only for this contest but for being the longest supporter of my work online. They’re a lean team of passionate creators that truly believe in supporting other creatives on their journey. Whether it’s a new camera, lens, workshop, or just some great articles, visit ShopMoment.com today.
What’s Next?
This guide collects all the best practices I’ve adopted over the last year while using the Leica SL3-S to create our launch film. I’ve worked with several cinematographers, colourists, and filmmakers to land in a place that’s reliable and scalable. It took some time, but I’m pretty damn proud of what we’ve put together. Like I mentioned at the beginning, I’ll look to update this guide as needed so if you notice anything that may need updating, let me know in the comments below. And if you’ve found this guide valuable, please do share it with other users as well.
Thanks for reading ✌🏾
GB
It's really helpful! Thank you! by the way, "image stabilization is tricky" means it causes wobbling when camera panning or vibration by walking footsteps. does it? I have this issue for a long time. Then I was wondering how other camera works like Canon.
This has been incredibly helpful setting up my sl3-s my friend. One quick question. If editing in a 3840x2160 timeline for base level 4k deliverables, are you scaling in a bit on the c6k and c4k 60 frame setting to fill the entire timeline frame that extra 6%? Or using another resolution?